User Guide
This page offers brief tutorials for usage and configuration of various Rapid-QC-MS features. Be sure to use the navigation guide below – or simply Ctrl + F – to find what you’re looking for.
Workspace configuration
Dashboard usage
Google Drive sync
QC notifications
Workspace configuration
Incorporating metadata for Specimens
To map metadata to Specimens, you can create a metadata table in CSV format and fill the following columns (where applicable):
- Filename
- Name from collaborator
- Specimen Name
- Species
- Matrix
- Growth-Harvest Conditions
- Treatment
Here is an example metadata table:
| Filename | Name from collaborator | Specimen Name | Species | Matrix | Growth-Harvest Conditions | Treatment | |
|---|---|---|---|---|---|---|---|
| Specimen_001 | A_1 | EMGO001_A_1 | Human HEK293T | Whole cell | Flash Frozen | BHB | |
| Specimen_002 | A_2 | EMGO001_A_2 | Human HEK293T | Whole cell | Flash Frozen | Butyrate | |
| Specimen_003 | A_3 | EMGO001_A_3 | Human HEK293T | Whole cell | Flash Frozen | No treatment |
Including a metadata table in a QC job allows metadata to be viewed in Specimen information cards. It also allows the intensity across Specimens plot to be filtered by treatments.

Setting up chromatography methods
The workflow for configuring chromatography methods is simple:
- Add a chromatography method
- Select the chromatography and polarity to modify
- Add an internal standard library
- Optional: Set a different MS-DIAL processing configuration
3a. Add a chromatography method
Navigate to Settings > Chromatography Methods. In the Manage chromatography methods section at the top, add a new chromatography method by giving it a name and clicking Add method.
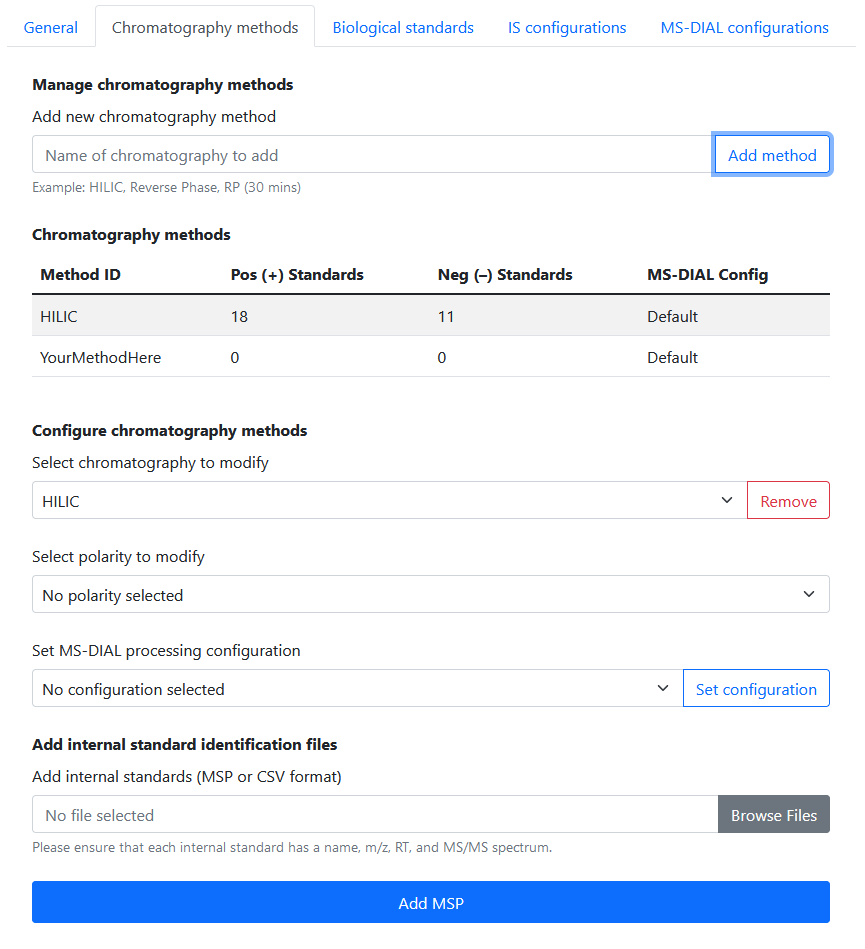
If successful, you should see your new method in the Chromatography Methods table.
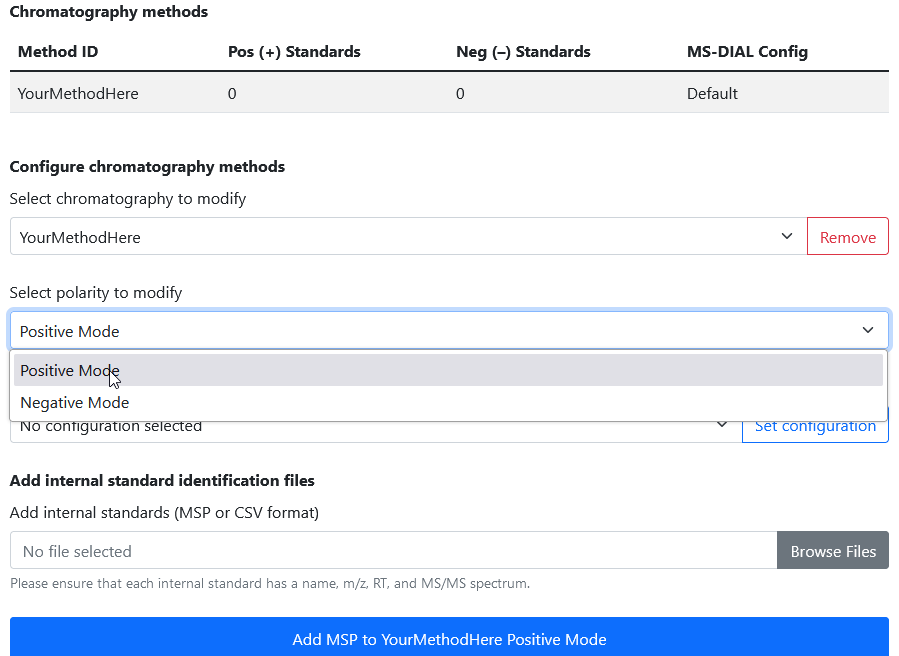
3b. Select the chromatography and polarity to modify
Internal standards must be configured for both positive and negative mode for each chromatography method.
Let’s start by selecting the chromatography method you created, and then selecting Positive Mode for the polarity.
3c. Add an internal standard library
Now, we can specify our internal standard library. Rapid-QC-MS accepts identification libraries in either MSP or CSV format.
It is important to note that MS-DIAL can only perform MS2 spectral matching using MSP libraries. If you use a CSV library, identification will be performed via m/z and RT matches.
Here is an example internal standard library in CSV format:
| Common Name | MS1 m/z | RT (min) |
|---|---|---|
| 1_Methionine_d8 | 158.1085398 | 7.479 |
| 1_1_Methylnicotinamide_d3 | 141.0975946 | 6.217 |
| 1_Creatinine_d3 | 117.0850186 | 4.908 |
| … | … | … |
| 1_Lysine d8 | 155.1630181 | 9.578 |
| 1_Phenylalanine d8 | 174.136469 | 6.92 |
| 1_Hippuric acid d5 | 185.0969033 | 3.011 |
And here is one internal standard from a library in MSP format:
NAME: 1_HippuricAcid_d5
SCANNUMBER: 1229
RETENTIONTIME: 3.011485
PRECURSORMZ: 185.0967
PRECURSORTYPE: [M+H]+
IONMODE: Positive
INTENSITY: 2.157809E+07
ISOTOPE: M + 0
INCHIKEY:
SMILES:
FORMULA:
Num Peaks: 33
51.02318    5550
56.94302    2599
57.93503    32786
...
171.3111    3202
181.08981   2837
185.09656   4996
Click the Browse Files button to browse for your MSP or CSV file, then click the Add MSP to
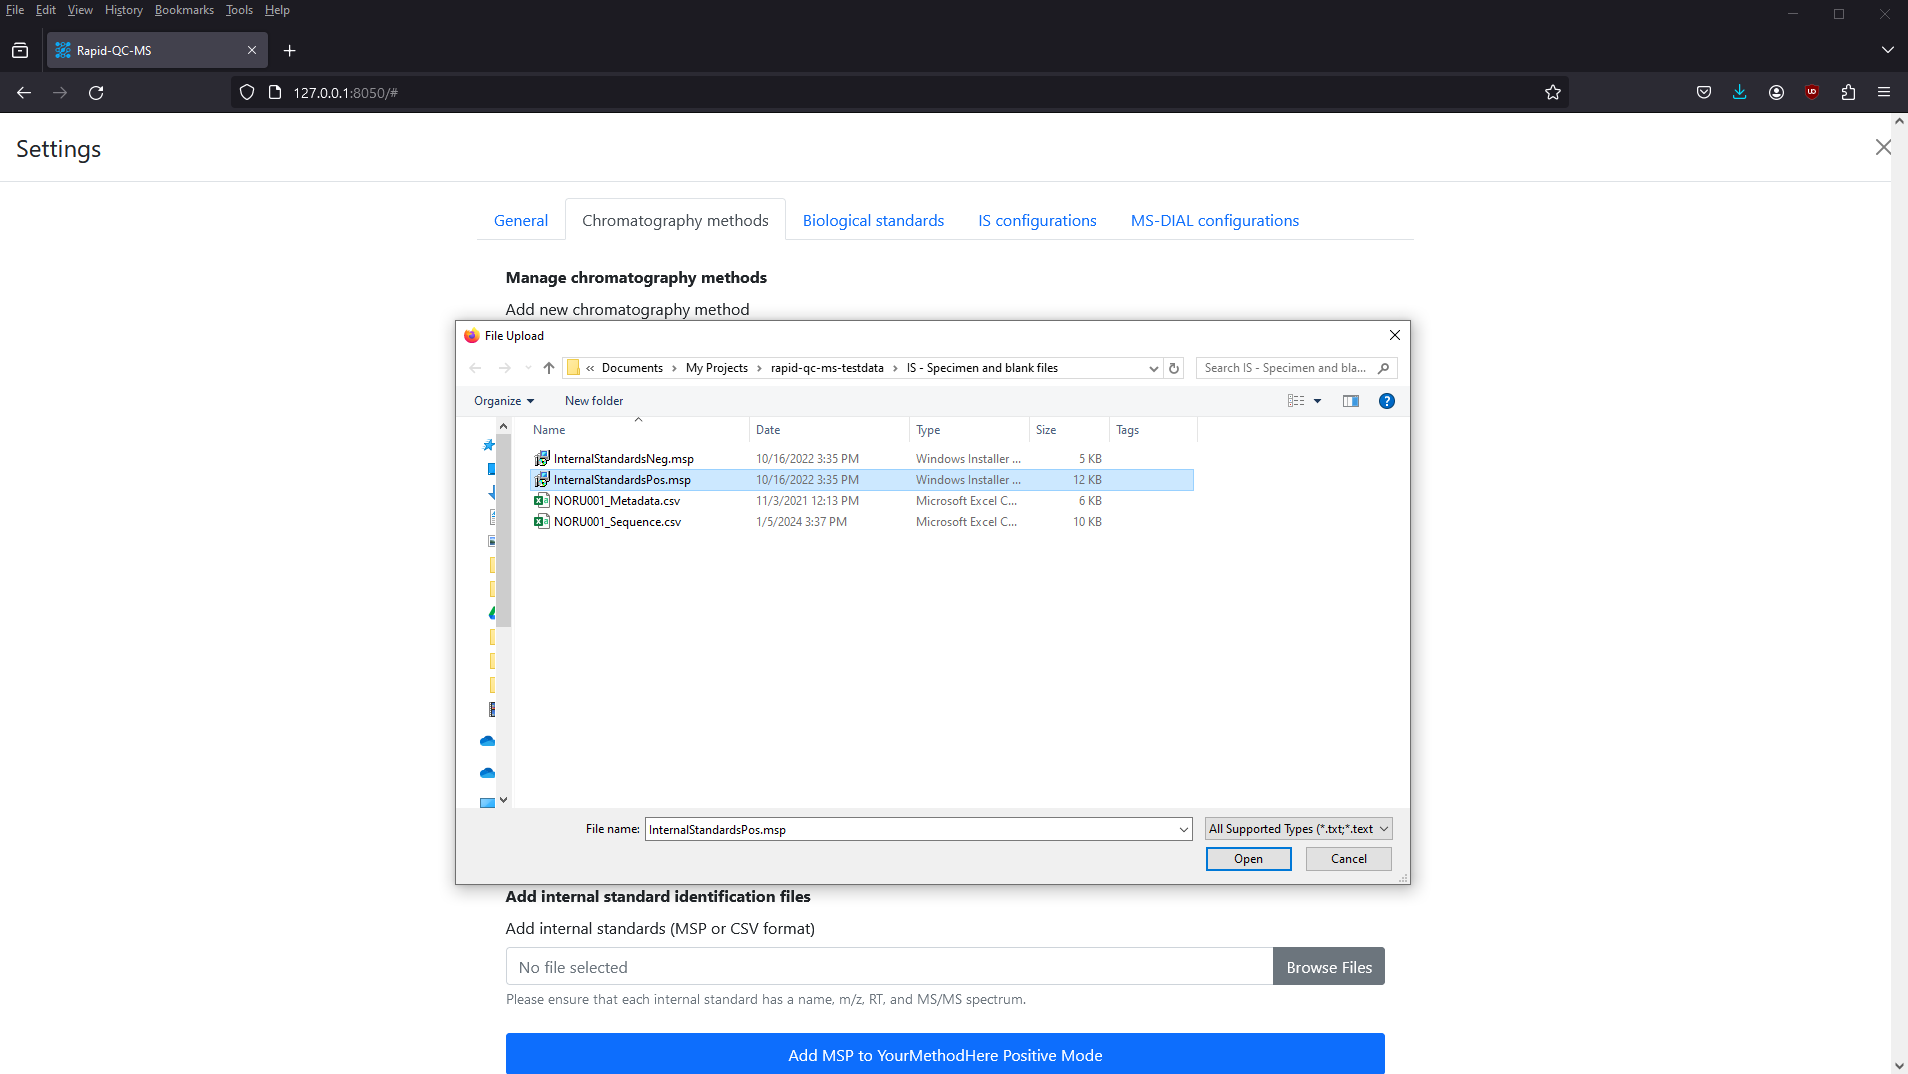
After a few seconds, your screen should look something like this.
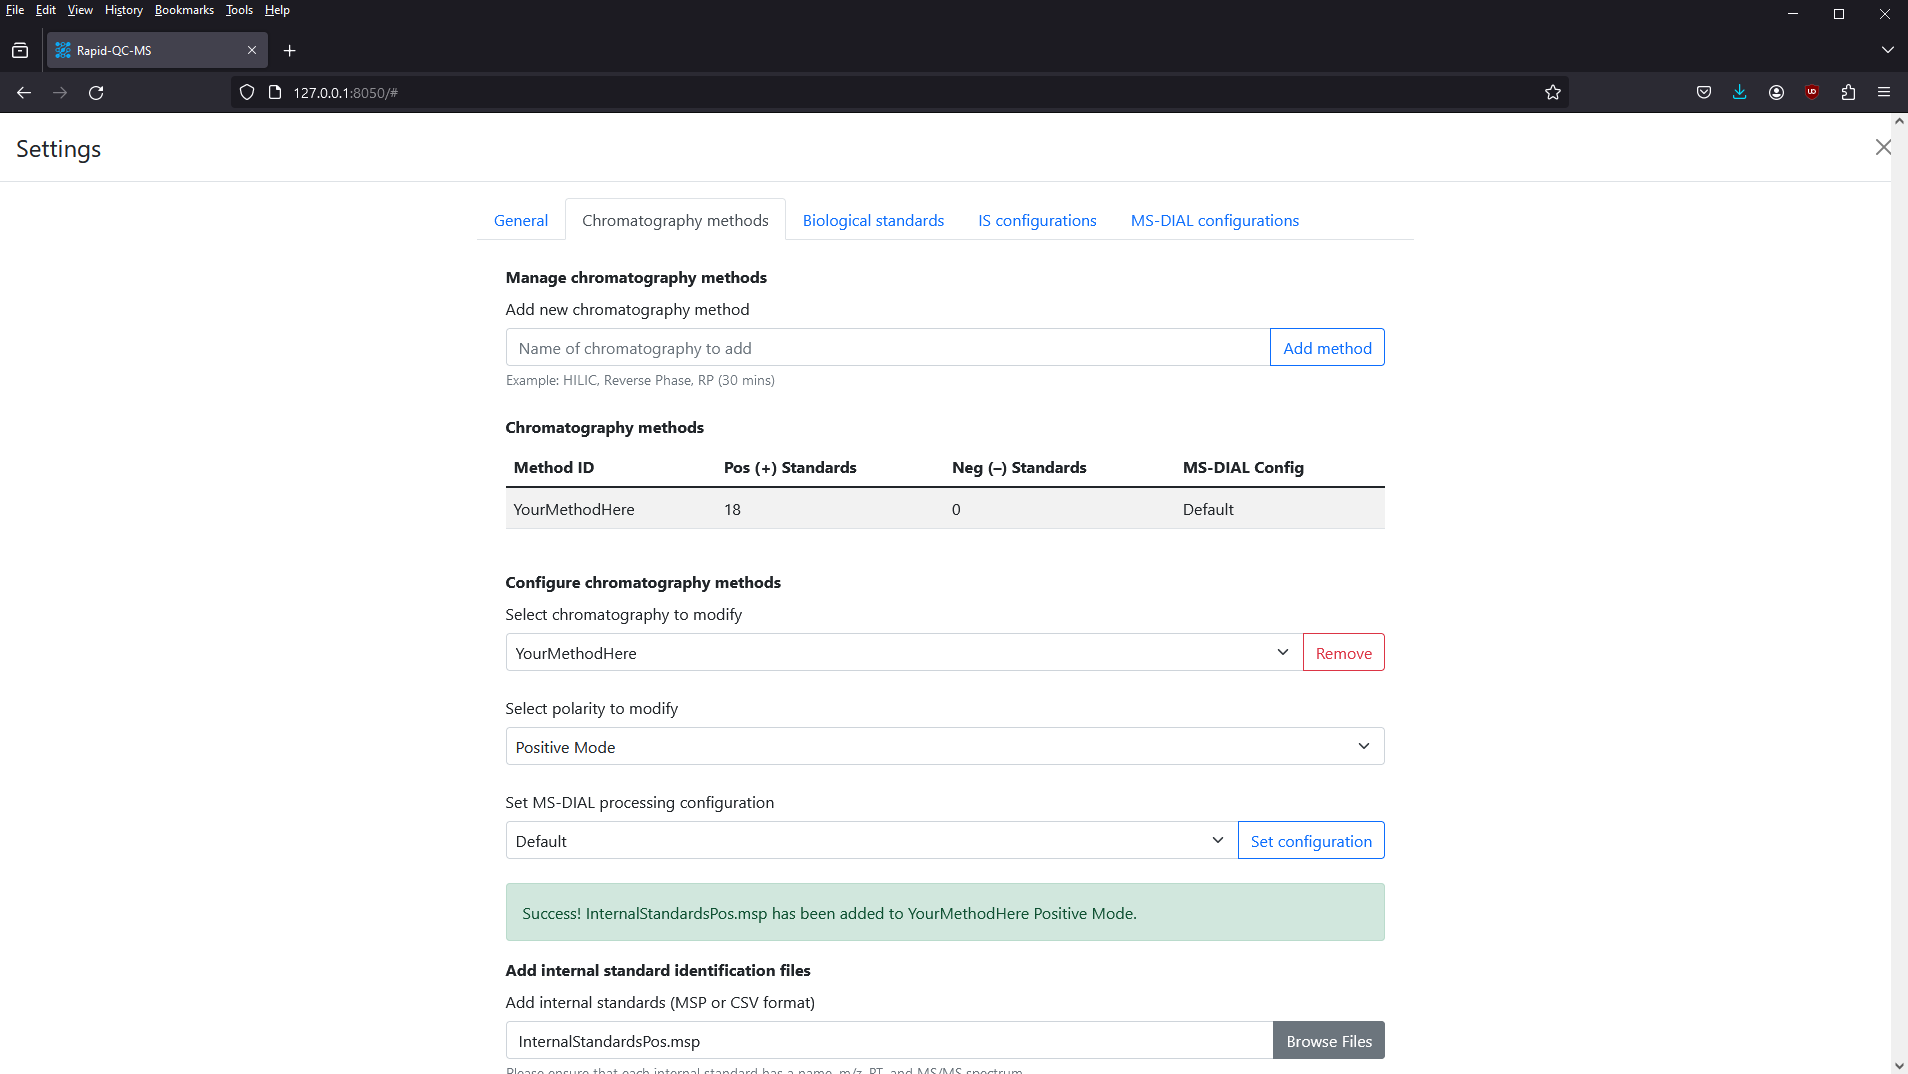
You can confirm that the library was successfully added by scrolling up to the Chromatography Methods table and seeing the updated number of Pos (+) Standards.
That’s it! Now, you can select Negative Mode from the polarity dropdown and add your negative mode internal standards.
Setting up biological standards
Biological standards are used to benchmark instrument performance based on the intensity of targeted features in the biological standard Specimens.
You can configure Rapid-QC-MS to detect and process biological standards accordingly using the following guide:
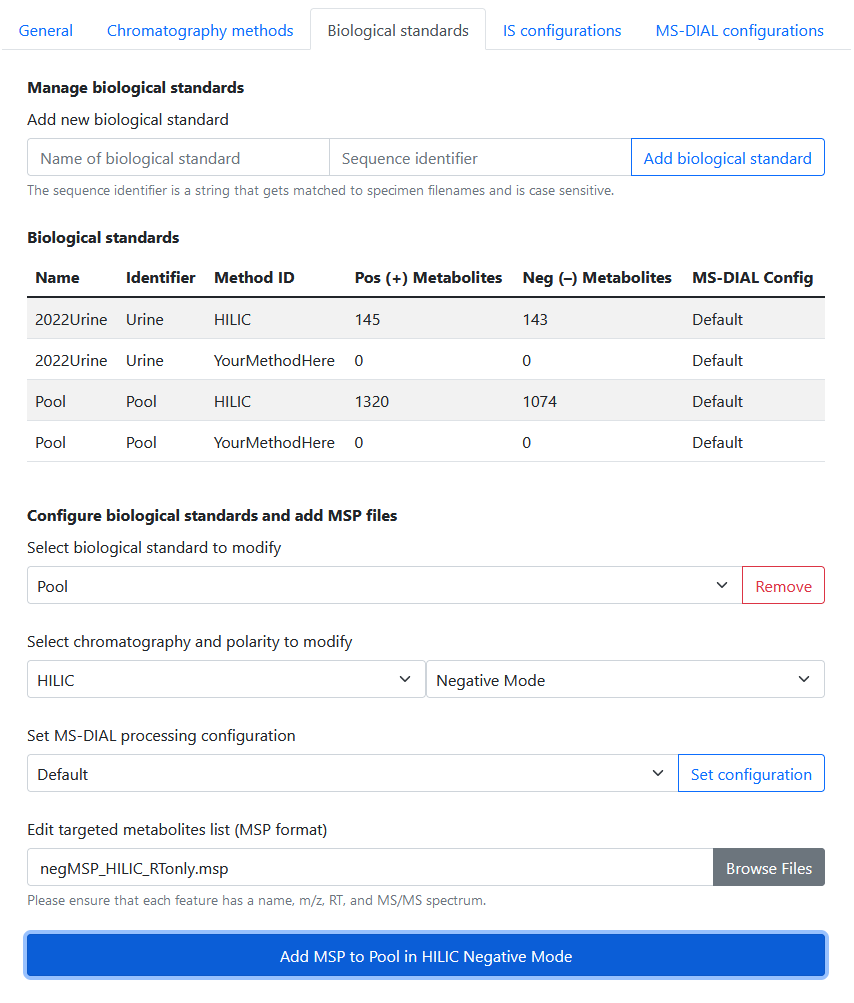
- Navigate to Settings > Chromatography Methods.
- Create a biological standard: this requires providing a name and sequence identifier.
- Select the chromatography method to edit: you can add libraries for different chromatography methods and polarities.
- Add an MSP library: this MSP library will be used for the biological standard / chromatography combination you select.
The sequence identifier is simply the text string that identifies biological standards in your acquisition sequences. For example, if “bac_sup” is the identifier for a biological standard, then any Specimen with “bac_sup” in its filename will be processed as a biological standard.
Targeted feature libraries must be in MSP format. Here is an example of one targeted feature in an MSP library.
NAME: Hippuric acid d5
SCANNUMBER: 1229
RETENTIONTIME: 3.011485
PRECURSORMZ: 185.0967
PRECURSORTYPE: [M+H]+
IONMODE: Positive
INTENSITY: 2.157809E+07
ISOTOPE: M + 0
INCHIKEY:
SMILES:
FORMULA:
Num Peaks: 33
51.02318    5550
56.94302    2599
57.93503    32786
...
171.3111    3202
181.08981   2837
185.09656   4996
You can also specify different processing configurations for biological standards by using the MS-DIAL processing configuration dropdown. These configurations can be created and saved in Settings > MS-DIAL Configurations.
Configuring QC parameters
Navigate to Settings > QC Configurations to define your QC criteria. Briefly, these are:
- Intensity dropouts cutoff: the minimum number of missing internal standards in a Specimen to constitute a QC fail
- RT shift from library value cutoff: the minimum retention time shift from the expected library value to constitute a QC fail
- RT shift from in-run average cutoff: the minimum retention time shift from the average RT during the course of the run to constitute a QC fail
- m/z shift from library value cutoff: the minimum m/z shift from the expected library value to constitute a QC fail
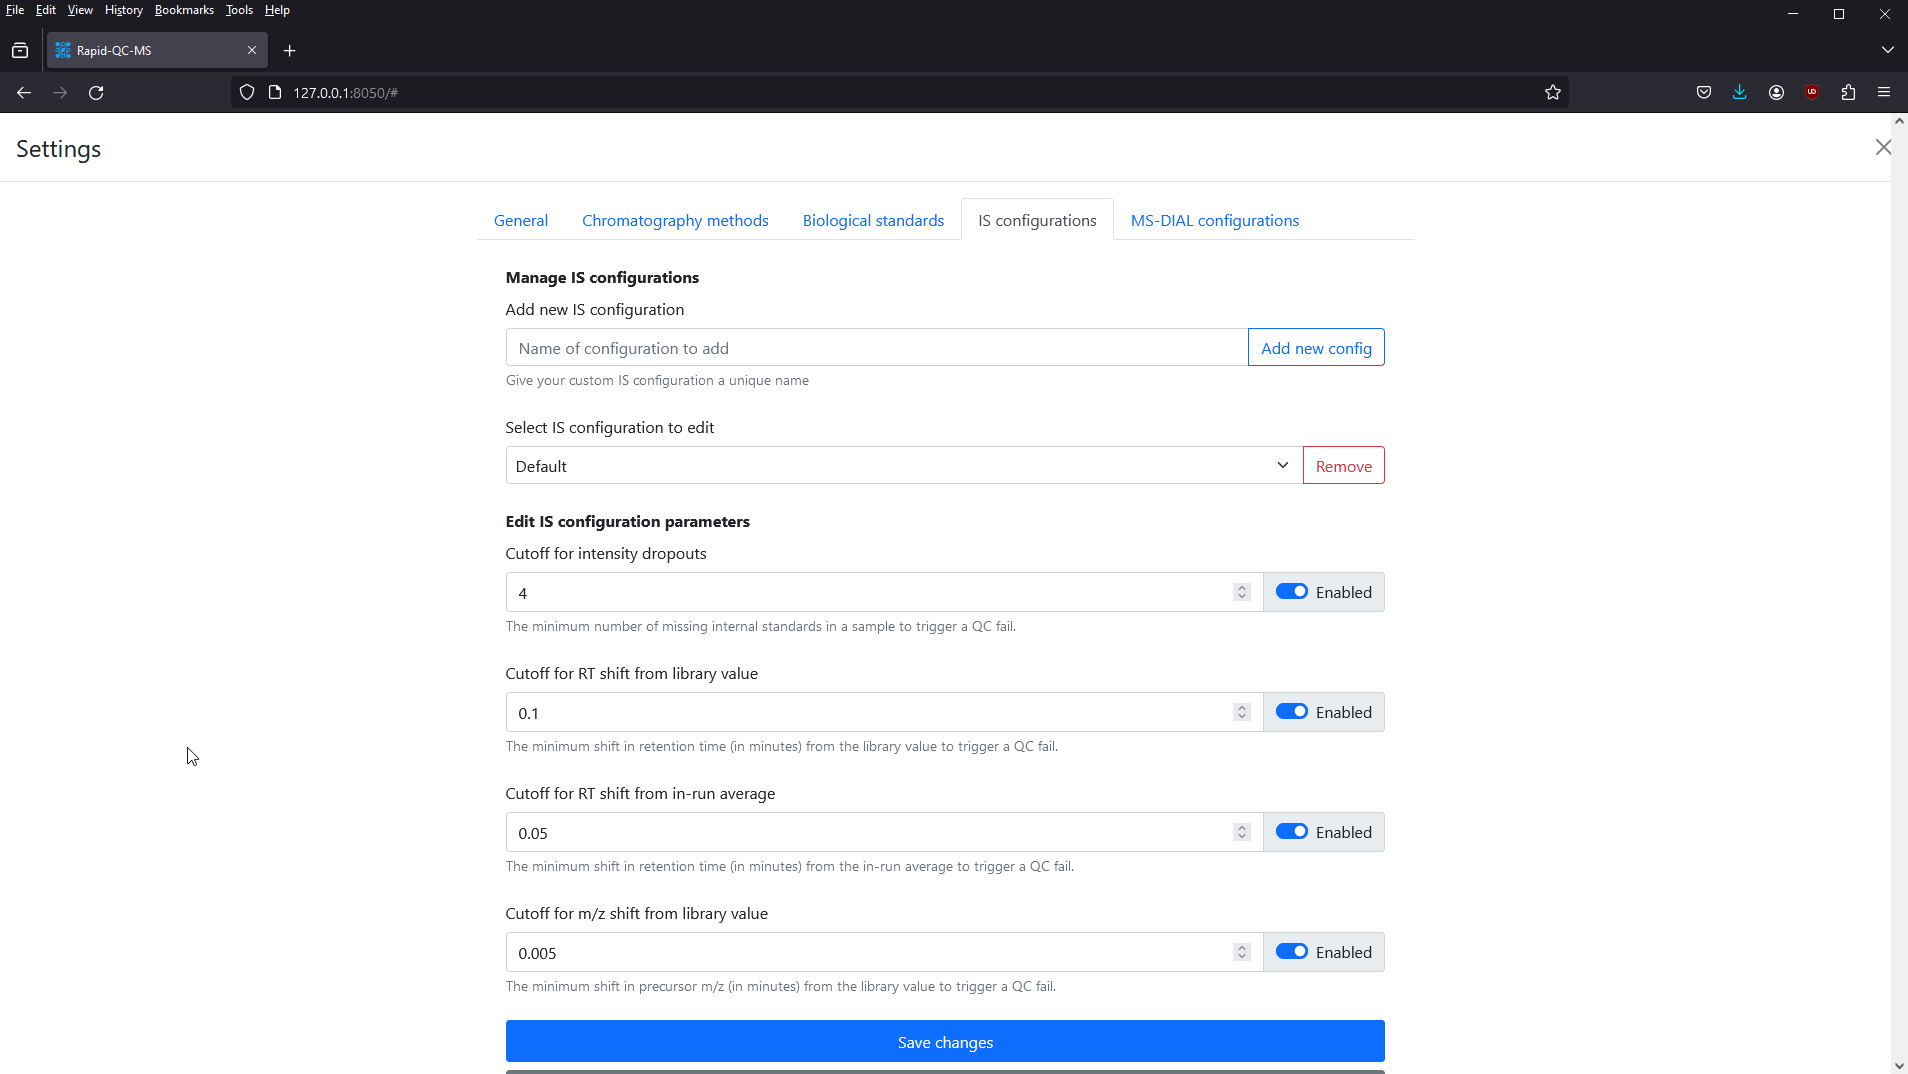
Rapid-QC-MS stores individual parameters in configurations, so that you can configure a specific configuration to fit each chromatography method. Every installation comes preloaded with a “Default” configuration containing recommended parameters.
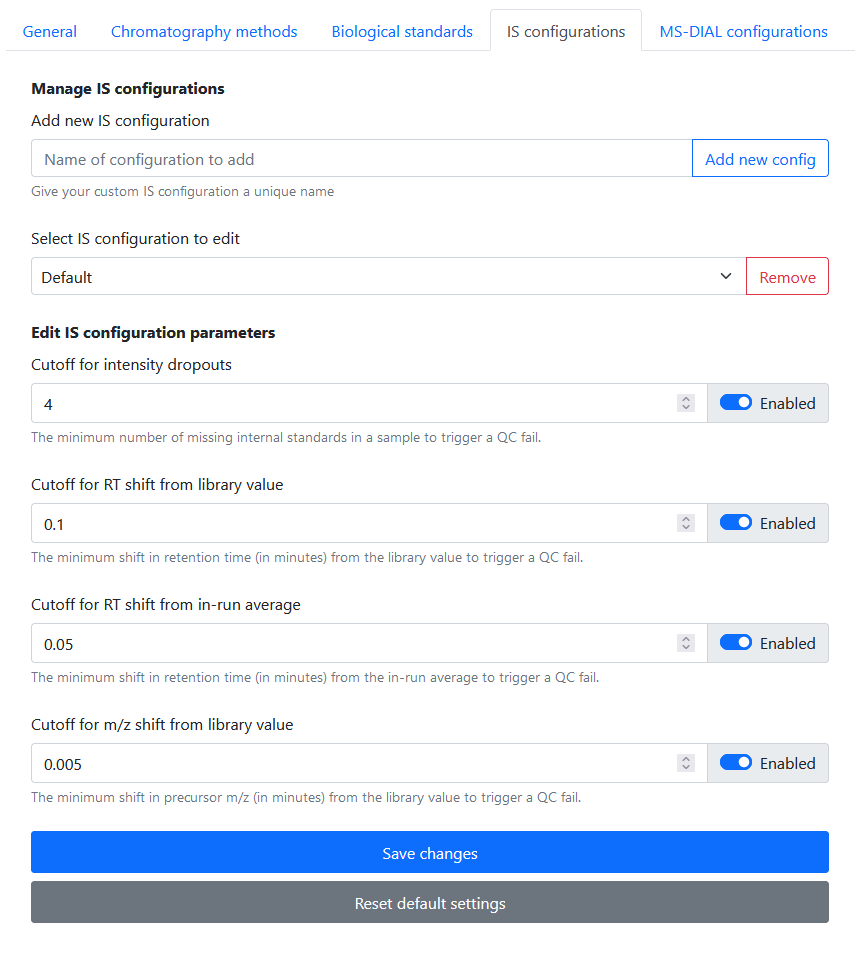
You can specify these parameters however you’d like, and enable / disable them as needed. To revert a configuration back to the default recommended settings, simply click the Reset default settings button.
Once you’re done, don’t forget to click Save changes!
Configuring MS-DIAL processing parameters
MS-DIAL is the processing software used to quantify internal standards in Specimens and targeted features in biological standards.
Rapid-QC-MS stores a set of MS-DIAL parameters in configurations, so that you can configure a specific configuration to fit each chromatography method. Every installation comes preloaded with a “Default” configuration containing recommended parameters.

You can create a new configuration using the Add new MS-DIAL configuration text field. Then, select it from the dropdown to edit its parameters. Once you’re done, the MS-DIAL configuration can be applied to chromatography methods and biological standards.
A wide range of parameters are available for modification to fit the user’s needs:
- Retention time begin
- Retention time end
- Mass range begin
- Mass range end
- MS1 centroid tolerance
- MS2 centroid tolerance
- Smoothing method
- Smoothing level
- Mass slice width
- Minimum peak width: Peak width threshold
- Minimum peak height: Peak height threshold
- Post-identification retention time tolerance
- Post-identification accurate MS1 tolerance
- Post-identification similarity score cutoff
- Alignment retention time tolerance
- Alignment MS1 tolerance
- Alignment retention time factor
- Alignment MS1 factor
- Peak count filter
- QC at least filter
For more details on MS-DIAL parameters, see the documentation here.
Once you’re done editing, don’t forget to click Save changes! You can now apply this processing configuration to your chromatography methods and biological standards.
Google Drive sync
Setting up Google Drive sync
To allow access to your workspace from any device, you must first create a project in the Google Cloud Console and generate an OAuth Client ID for your installation of Rapid-QC-MS.
These actions only need to be performed once. Upon completion, any shared user will be able to use the Client ID and Client Secret to sign in to your workspace.
1. Create a project in the Google Cloud Console
In case the above steps are too difficult to follow, below is a detailed walkthrough of the process with screenshots.
Navigate to the Google Cloud Console. The landing page should look something like this:
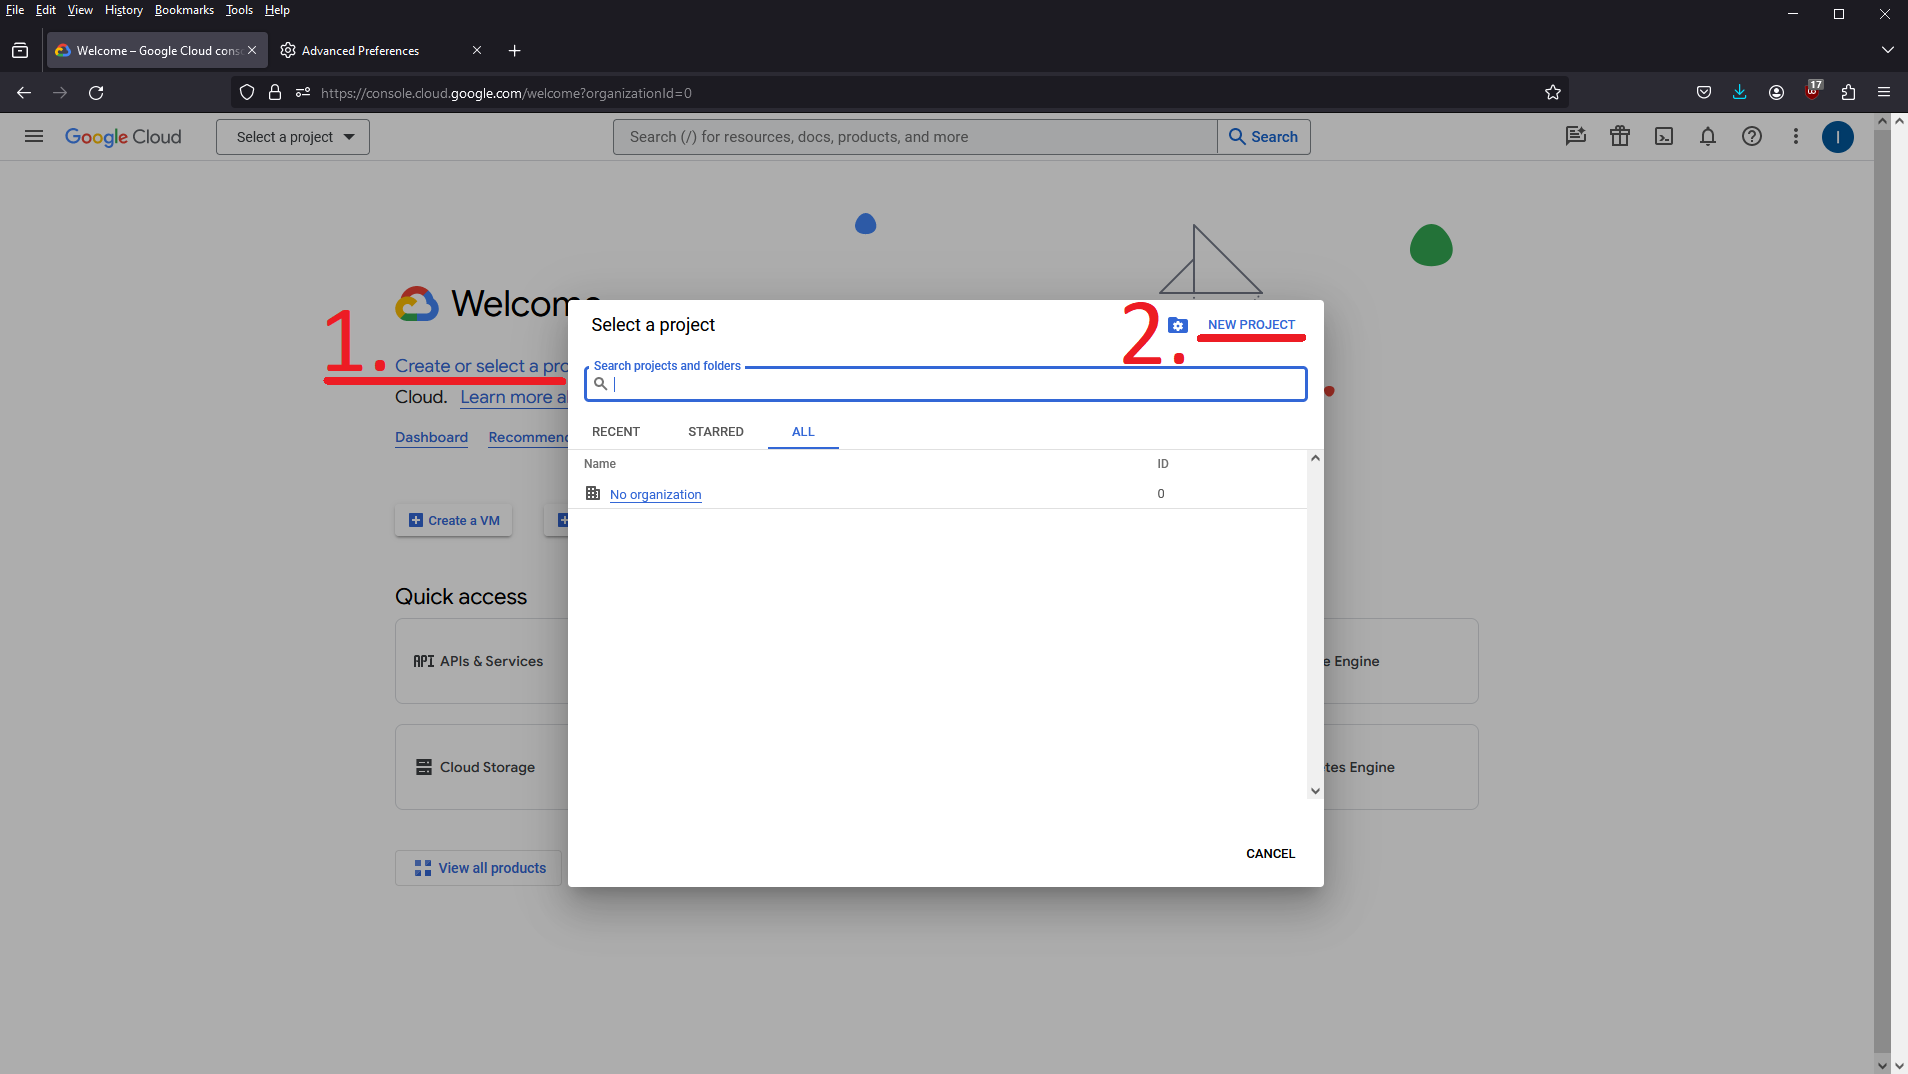
Choose Create or select a project, then click New Project.
Name the project whatever you like, ideally something partly unique that you’ll recognize, and click Create. If you don’t see the Organization field, your account doesn’t belong to a google workspace. Without a workspace, the only option is to create an external app which does not work for our use case.
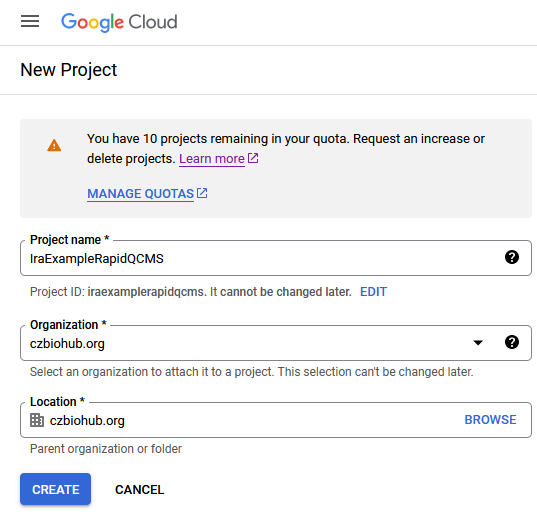
Then select your newly created project from the dropdown in the upper left

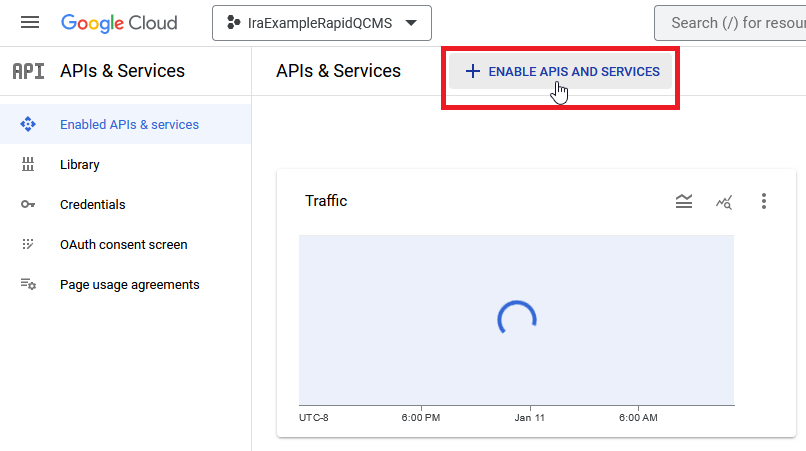
Now, from the sidebar, navigate to Enabled APIs and services and click Enable APIs and Services.
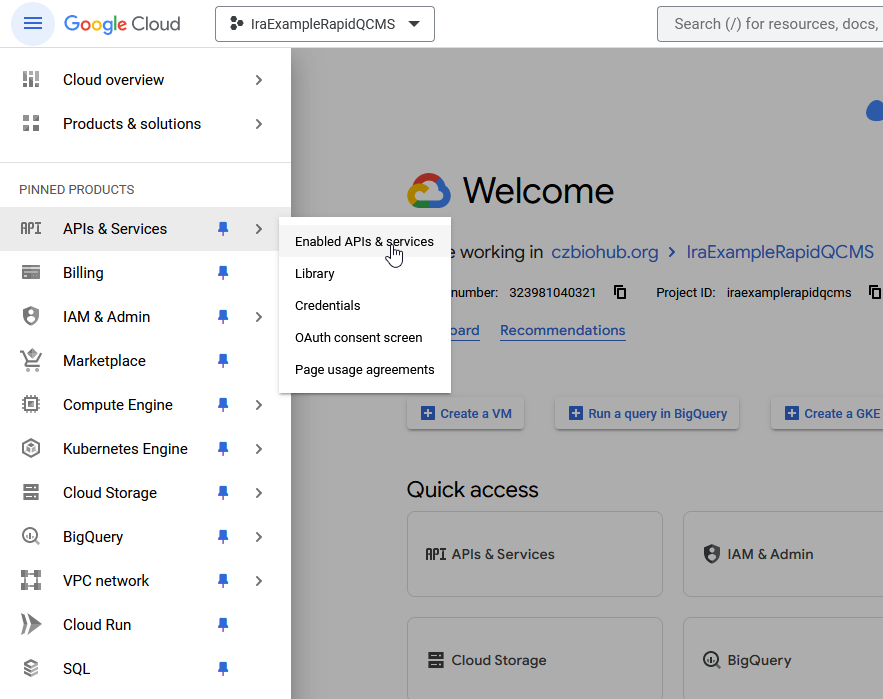
Next, search for “Gmail API”, select it, and click the Enable button and wait for google to process your request. Once it’s enabled, go back and repeat the process for “Google Drive API”
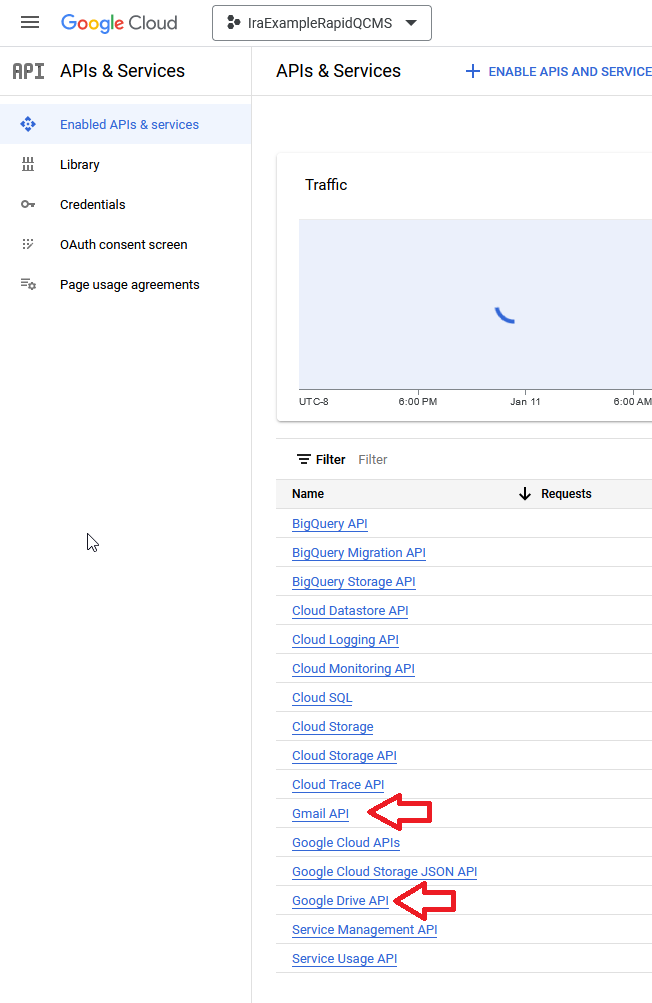
If all went well, both API’s should be visible on the API & Services package
2. Configure the OAuth consent screen
From the sidebar, navigate to APIs & Services > OAuth consent screen.
For user type, choose Internal and click Create. Fill in the following:
- App name: Something unique to you or your organization + RapidQCMS
- User support email: [youremail]
- Developer contact information (at the bottom): [youremail]
Once you’re done, click Save and Continue at the bottom.
On the next screen, select Add or Remove Scopes. Scroll down to the Manually add scopes section and paste in the following:
https://www.googleapis.com/auth/drive
https://www.googleapis.com/auth/gmail.send
https://www.googleapis.com/auth/userinfo.email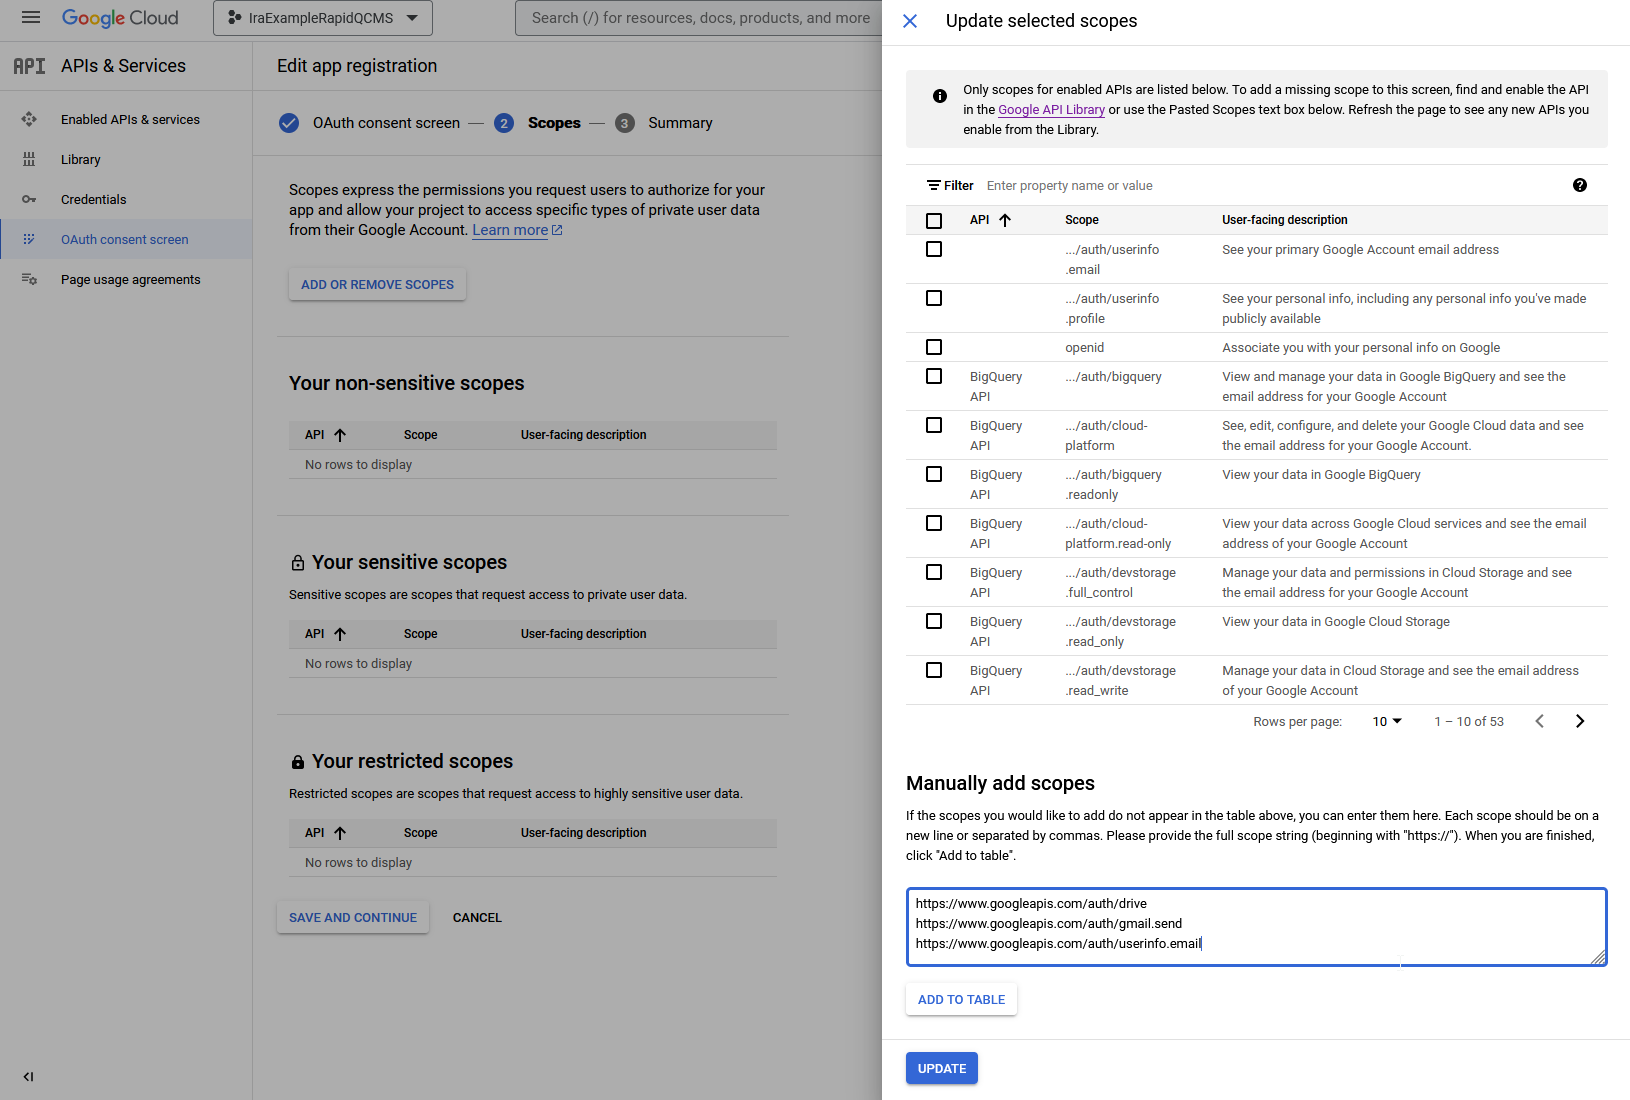
Click Add to Table. Then click Update. Then click Save and Continue at the bottom on the left.
3. Generate the OAuth Client ID
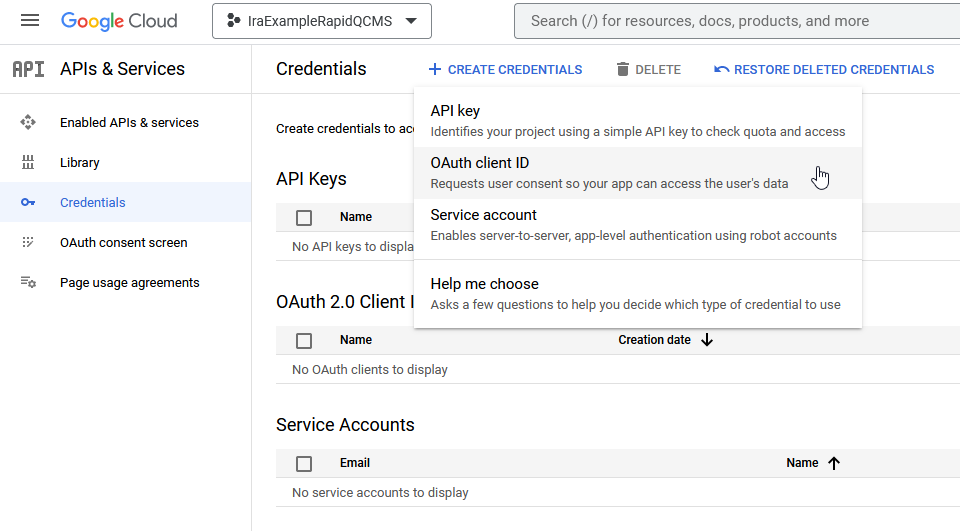
From the sidebar, navigate to APIs & Services > Credentials.
Click the Create Credentials button and select OAuth client ID.
For application type, choose Desktop application and enter a name, this won’t show up except in logs so some combination of a unique name + desktop + RapidQCMS is fine (e.g. IraDesktopRapidQCMS).
Once you’re done, click Create. A dialog window will appear, providing your client ID and client secret.
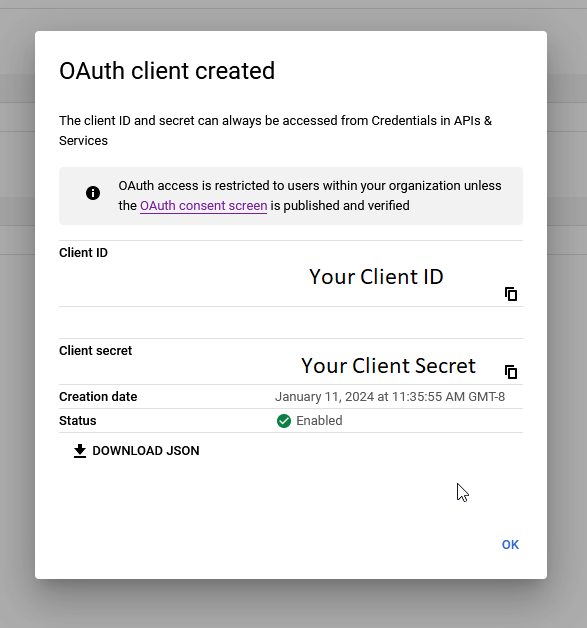
That’s it – you’re all set! Copy these and save them somewhere accessible. If you’re here from the Quickstart guide, click here to head back and use these credentials to set up or sign in to your workspace.
Adding instruments to workspace
To add an instrument to an existing Rapid-QC-MS workspace, perform the following steps:
- Install Rapid-QC-MS on your instrument computer
- Launch the app by entering
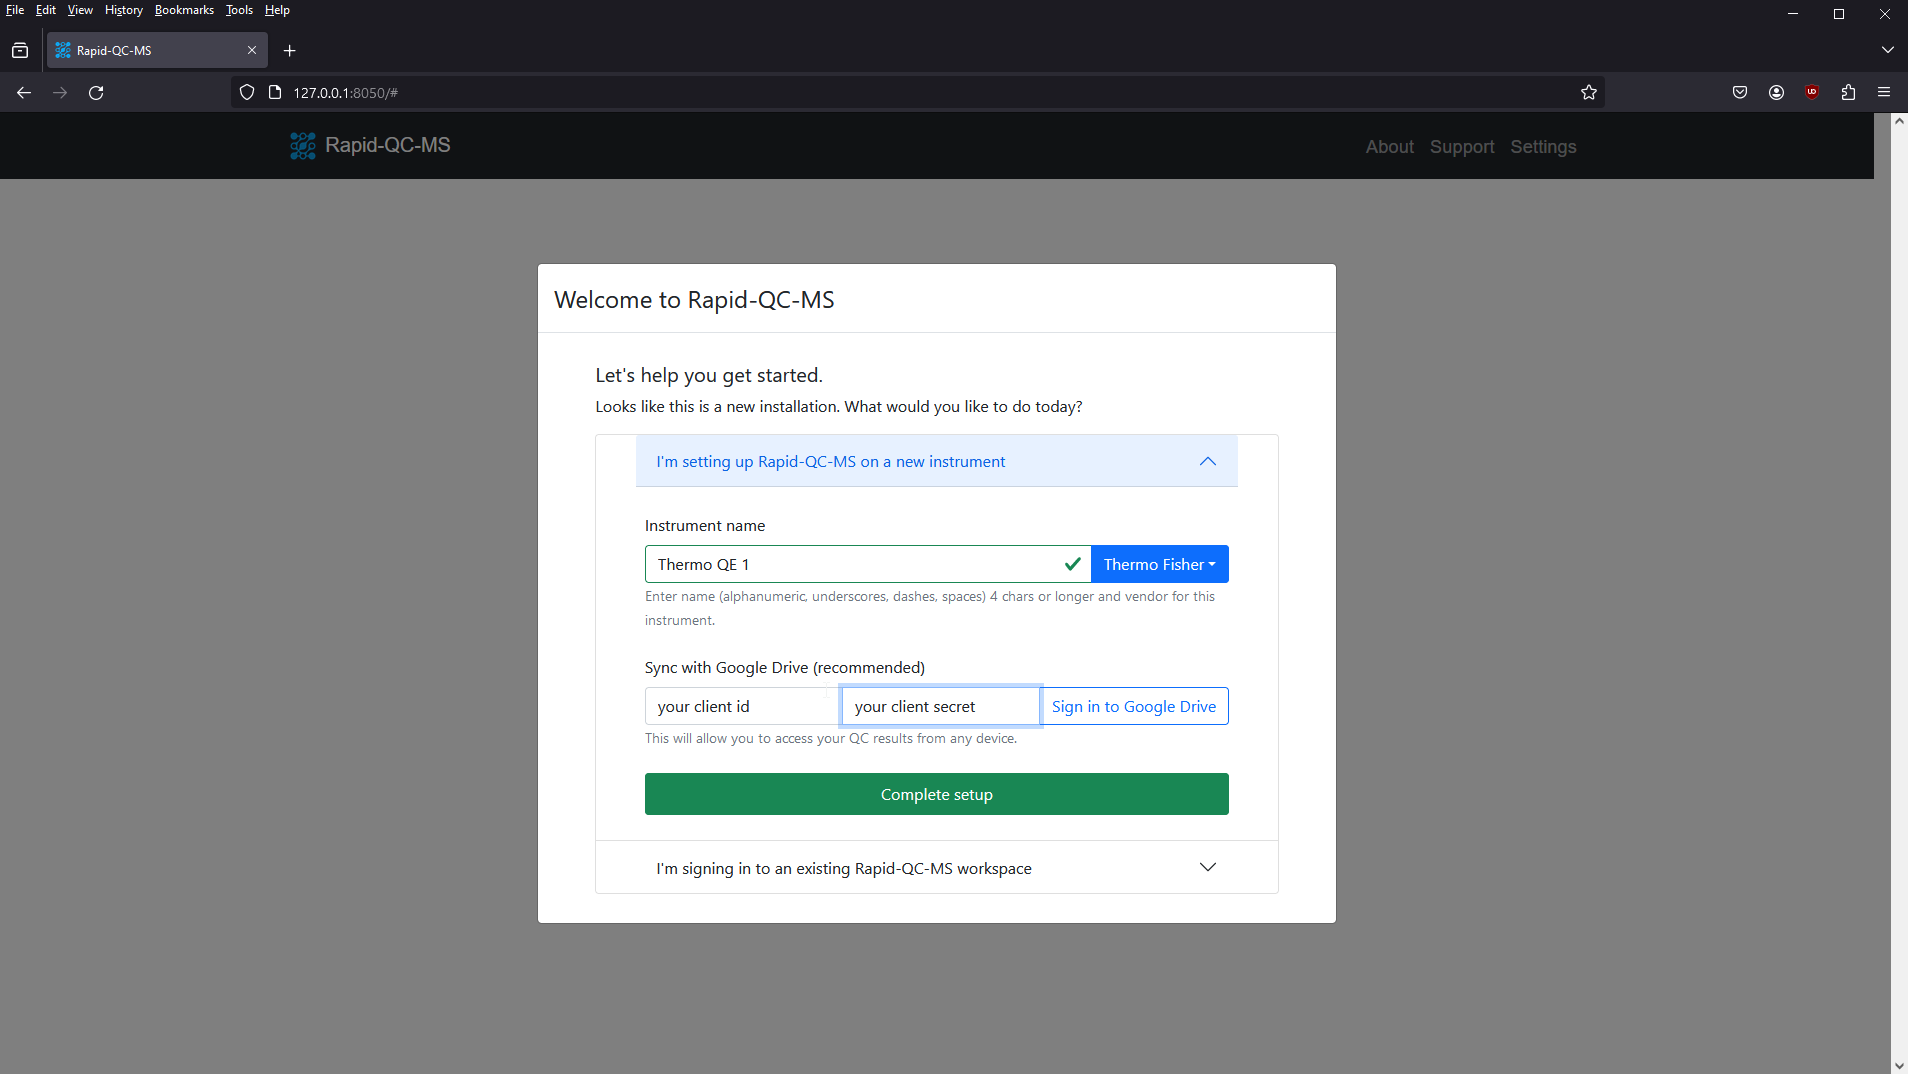
ms_autoqcin a terminal window - Select the I’m setting up Rapid-QC-MS on a new instrument tab
- Give your instrument a name and specify the vendor
- Enter your client ID and client secret, then click Sign in to Google Drive
- Complete the authentication flow
- Once you’re done, Rapid-QC-MS will alert you that your workspace was found
- Click Complete setup and you’re all set!
Important: Currently, it is not possible to add an instrument to an existing workspace after setup. If you want to add your instrument to an existing workspace, it must be done during setup immediately after a fresh install.
Granting / revoking workspace access
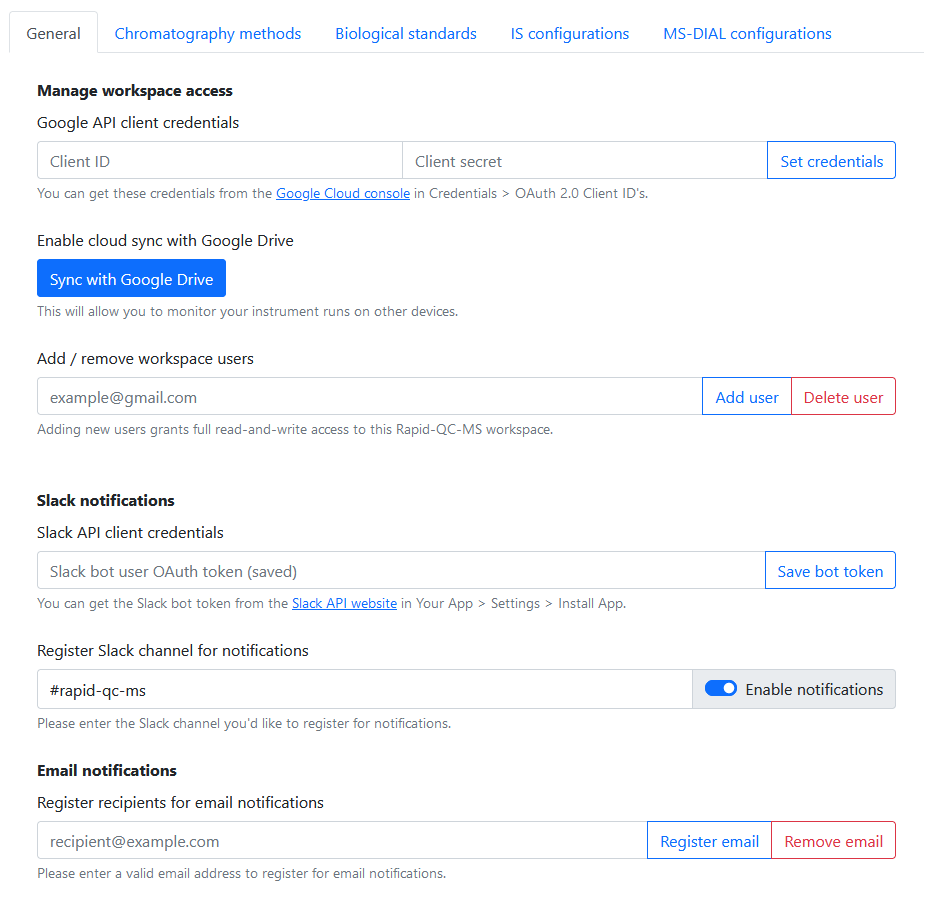
You can grant and revoke access to your Rapid-QC-MS workspace from Settings > General.
Under Manage workspace access, add the email addresses for Google accounts you’d like to share your workspace with.
Signing in to workspace from external devices
You can use your generated client ID and client secret to log in to your workspace from any device.
- Install Rapid-QC-MS on your device
- Launch the app by entering
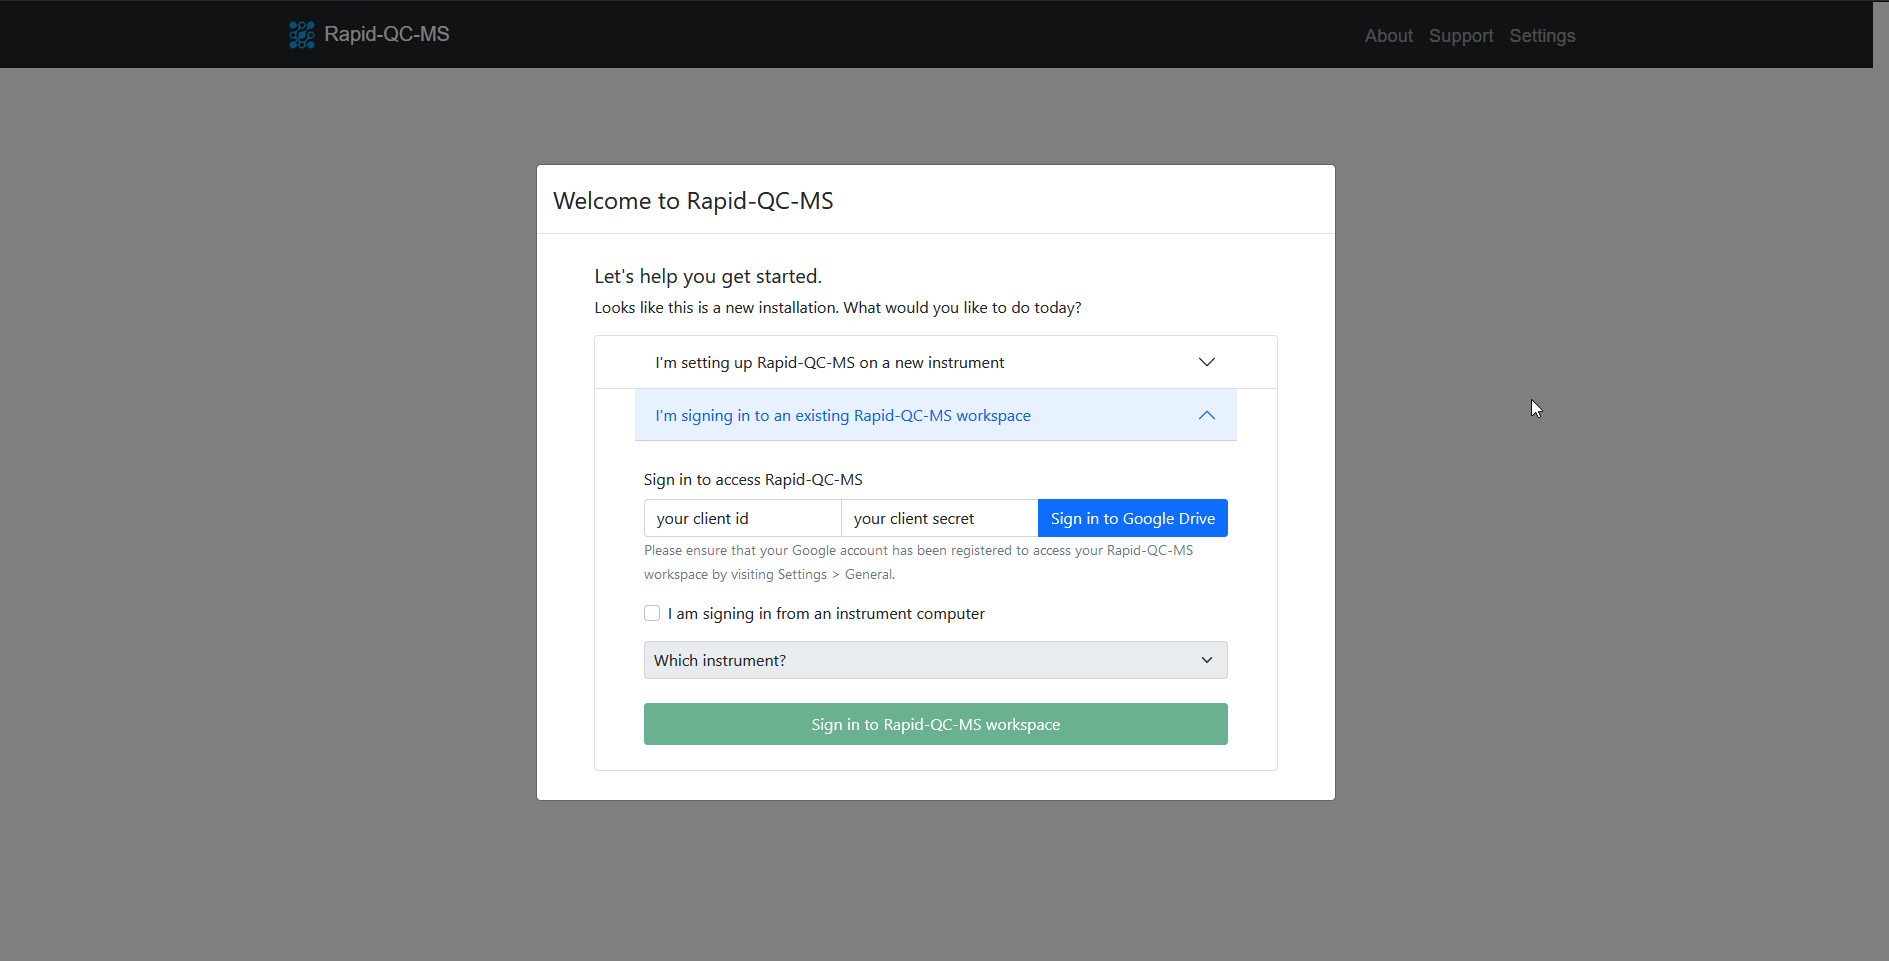
ms_autoqcin a terminal window - Select the I’m signing in to an existing Rapid-QC-MS workspace tab
- Enter your client ID and client secret, then click Sign in to Google Drive
- Complete the authentication flow
- Click Sign in to Rapid-QC-MS workspace and you’re all set!
Important: the I’m signing in from an instrument computer checkbox is intended for signing in to the workspace after reinstalls on the instrument computer.
Important: To allow your team members to sign in to the workspace using their Google account, you must first grant them access in Settings > General.
QC notifications
Setting up Slack notifications
To set up Slack notifications, you must create your own Slack bot, generate an OAuth token for it, and give that token to Rapid-QC-MS in Settings > General.
You only need to do this once! After that, Rapid-QC-MS will use your token to alert you about QC warnings and QC fails.
1. Create your Slack bot
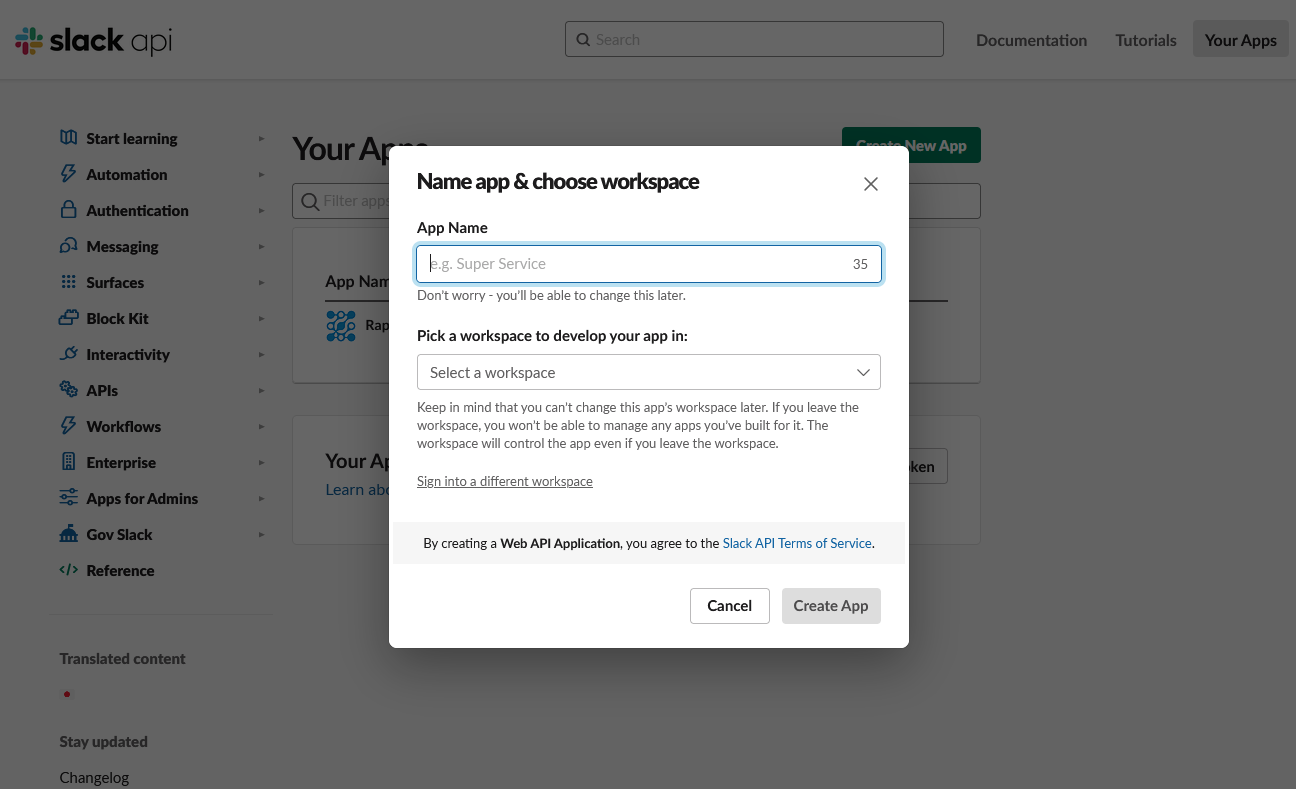
Navigate to the Slack API console and click the Create New App button.
Choose to create your app From Scratch. Fill in the App Name (Rapid-QC-MS is fine) and your Slack workspace, then click Create App.
2. Generate an OAuth token
From the sidebar, navigate to Features > OAuth & Permissions.
Scroll down to the Scopes section. For Bot Token Scopes, add the following OAuth scopes:
chat:write
chat:write.public
incoming-webhook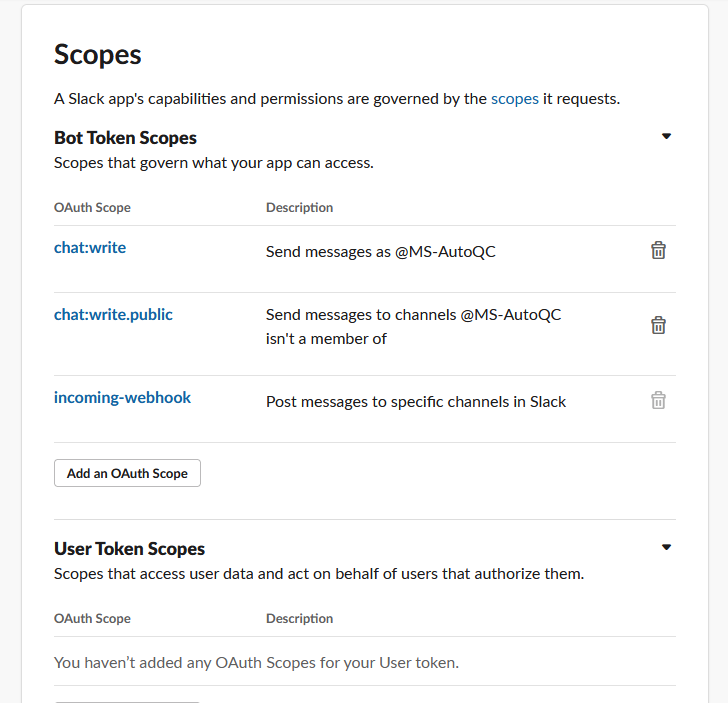
Now, scroll back up to the OAuth Tokens for Your Workspace section and click Install to Workspace, then copy the generated Bot User OAuth Token.
3. Give token to Rapid-QC-MS
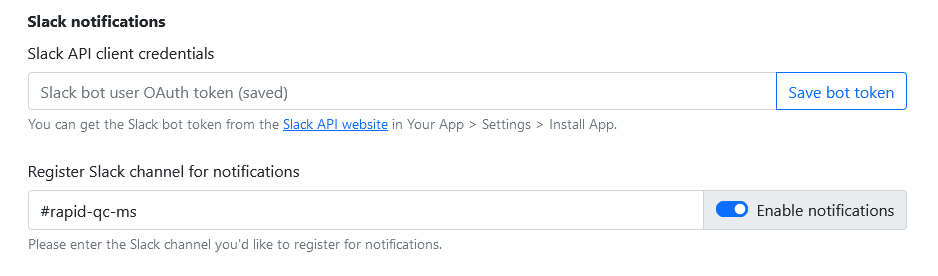
In Rapid-QC-MS, navigate to Settings > General and paste the Bot User OAuth Token you generated in the Slack API client credentials field. Click Save bot token.
Now, enter the name of the channel you’d like Rapid-QC-MS to post messages to. Once you’re done, toggle Enable notifications.
Lastly, you may need to invite the bot to the channel. The easiest way of doing this is to just @botname in the channel and slack will ask if you want to invite it.
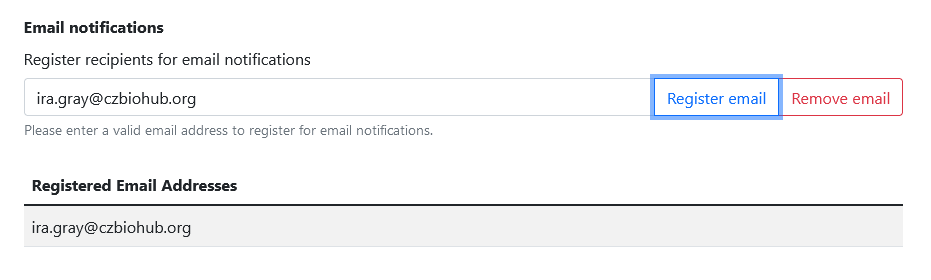
Setting up email notifications
To set up email notifications, you must first enable Google Drive sync.
Once that’s done, all you have to do is navigate to Settings > General and register email addresses for notifications!