System Design
This section details the backend data infrastructure and data processing pipeline packaged into Rapid-QC-MS, as well as some of the structure and logic of the Dash callbacks that serve the frontend app interface.
If you have any questions, concerns, or suggestions about the design of Rapid-QC-MS, please don’t hesitate to contact us!
Design pattern
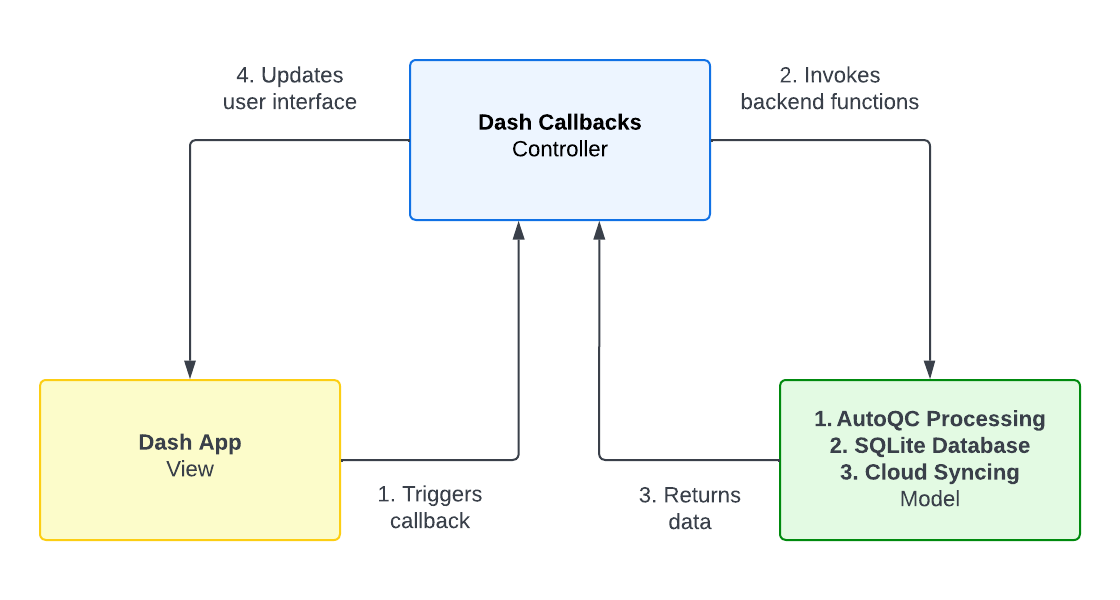
Rapid-QC-MS was designed with flexibility and scalability in mind. The project follows the MVC (Model-View-Controller) design pattern. The separation of concerns allows multiple developers to manage and make changes to the frontend and backend easily.

Frontend
The frontend consists of a Dash app, which launches on startup and can be used from the browser. Dash is a powerful, open-source Python framework (built atop React, Plotly, and Flask) for building web applications.
In summary, components make up a user interface, and callbacks map inputs from one component to outputs of another. There is very little boilerplate code required to get started, and the library is extremely well-documented by the developers and community.
Backend
The backend is organized into five different files:
- AcquisitionListener defines classes and functions for monitoring data acquisition paths and processing data files.
- DatabaseFunctions provides highly-abstracted API for reading from and writing to databases.
- AutoQCProcessing is a modular pipeline for processing data files, performing QC checks, and writing QC results to the database.
- SlackNotifications defines functions for controlling the Slack bot.
- PlotGeneration parses QC results from the database into the browser cache to generate Plotly graphs.
The complete project structure is as follows:
Rapid-QC-MS/
│
├── src/
│   └── ms_autoqc/
│       ├── __main__.py
│       ├── AcquisitionListener.py
│       ├── DatabaseFunctions.py
│       ├── AutoQCProcessing.py
│       ├── PlotGeneration.py
│       └── SlackNotifications.py
│
├── data/
│   └── methods/
│       ├── Settings.db
│       ├── Example_Library_Pos.msp
│       └── Example_Library_Neg.msp
│   └── Example_Instrument.db
|
├── auth/
│   ├── credentials.txt
│   └── settings.yaml
|
├── assets/
│   ├── favicon.ico
│   └── styles.css
|
├── .gitignore
├── README.md
├── requirements.txt
└── pyproject.toml
Database schema
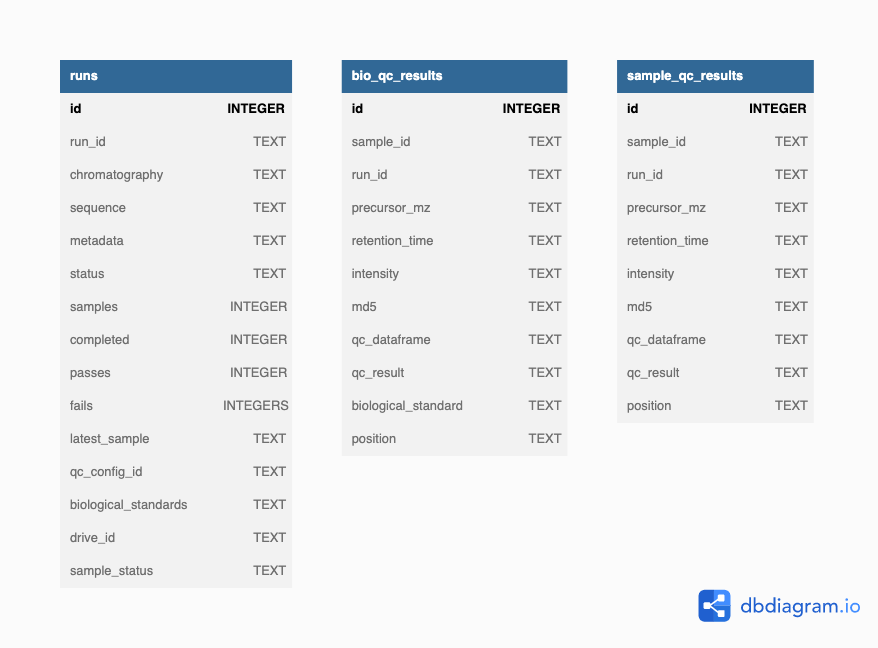
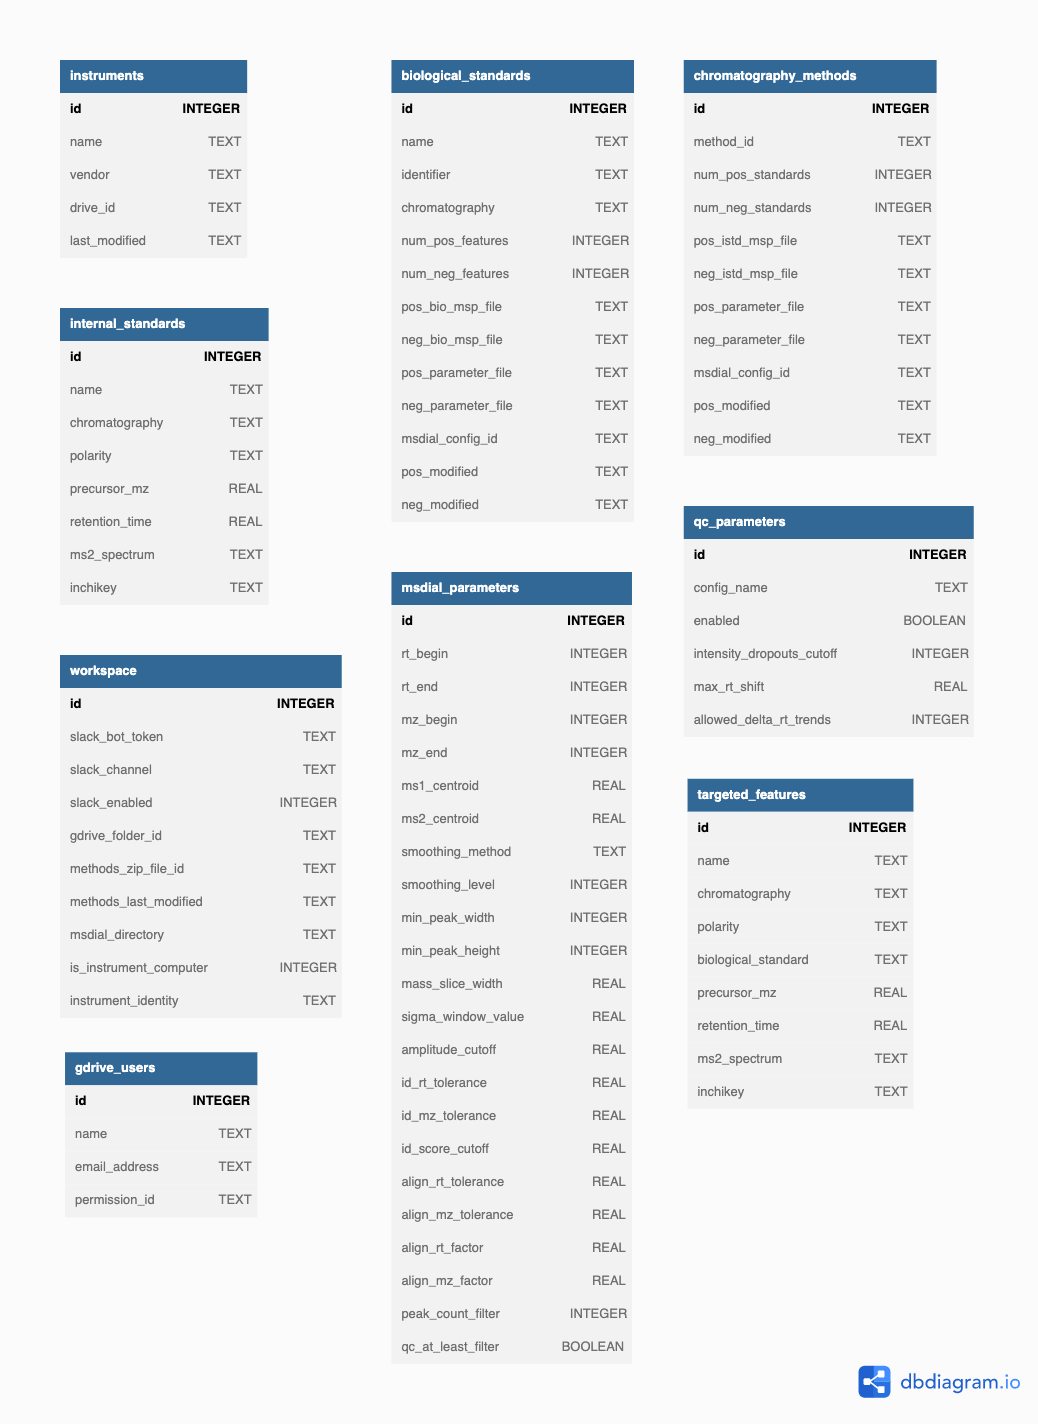
Data stays in persistence in two types of SQLite databases:
- The instrument database(s)
- The settings database
An Rapid-QC-MS workspace is comprised of the instrument databases and methods directory (which stores MSP/TXT libraries, MS-DIAL parameter files, and the settings database).
A diagram of the each database’s schema is shown below.
Instrument database

Settings database

Processing workflow
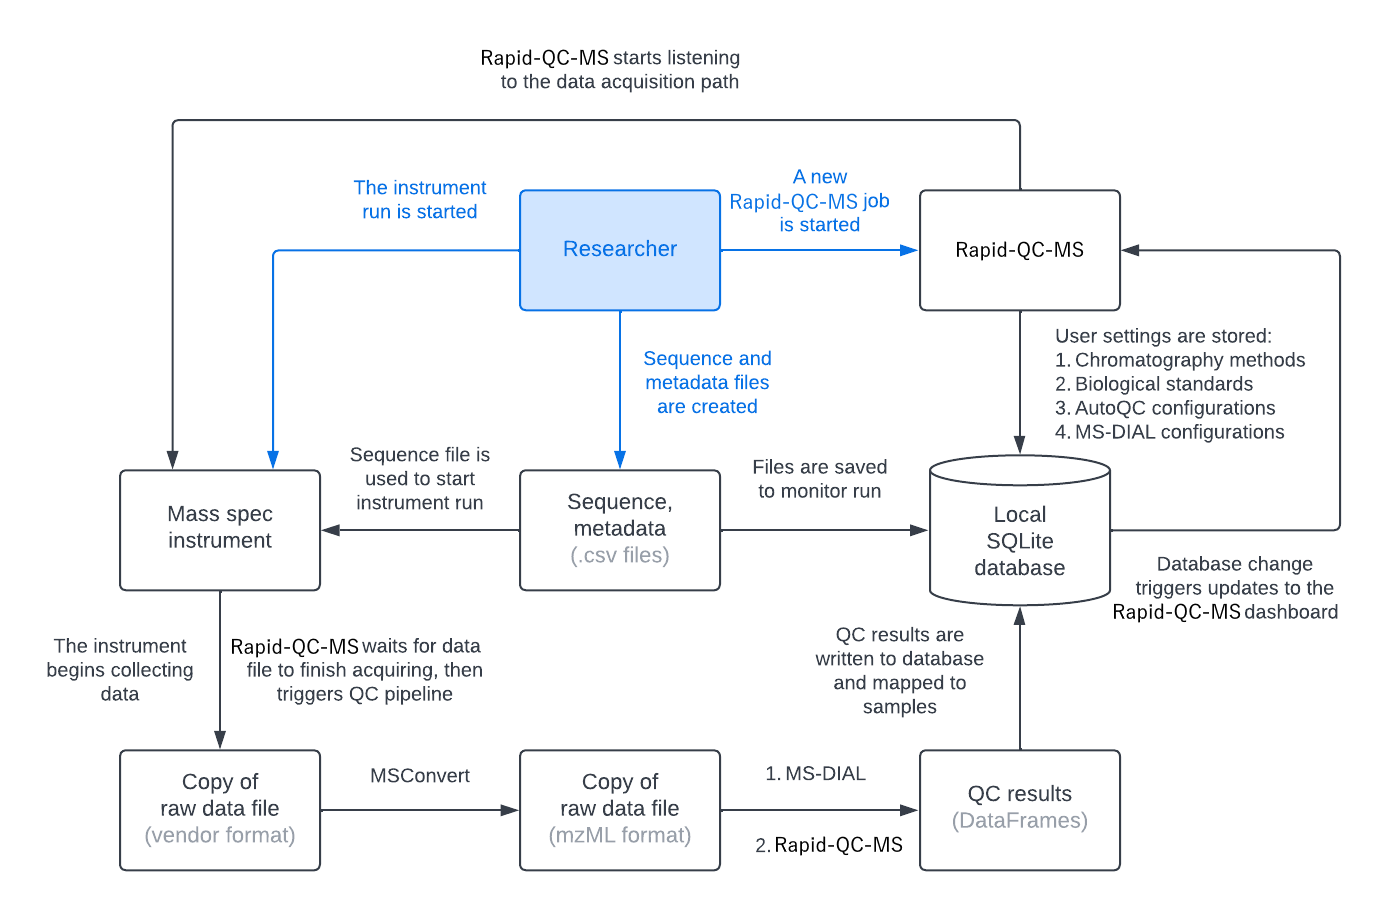
The diagram below gives a broad overview of how Rapid-QC-MS listens to instrument runs and processes your data safely and securely. To summarize:
- The user prepares their run sequence and starts an instrument run
- The user gives Rapid-QC-MS the sequence file and the data acquisition path
At this point, the user’s work is done. They can start monitoring their instrument run from the Rapid-QC-MS dashboard. Now, the Rapid-QC-MS workflow is initialized.
- Rapid-QC-MS starts “listening” to the data acquisition path
- When the instrument starts collecting sample data, Rapid-QC-MS starts comparing checksums
- Once the sample data has been acquired, the processing pipeline is launched
- MSConvert converts a copy of the raw data file from closed vendor format to open mzML format
- MS-DIAL processes the mzML file and quantifies internal standards
- Rapid-QC-MS performs quality control checks (based on user-defined criteria)
- If there are any QC fails or warnings, the user is notified (if user opted in for notifications)
- QC results are written to the local database and trigger an update to the Rapid-QC-MS dashboard

The following sections discuss the Rapid-QC-MS workflow in detail.
1. Rapid-QC-MS starts listening to the data acquisition path
To initialize the workflow, several functions are executed:
- The instrument run is written to the database
- MSP library files are retrieved from the database
- MS-DIAL parameter files are generated for chromatography methods and biological standards
- Filenames are parsed out from the acquisition sequence file
Once this is done, the acquisition path, filenames, and run ID are passed to the acquisition listener, which is started in the background as a subprocess.
new_autoqc_job_setup() function in DashWebApp.py:
DashWebApp.py
@app.callback(...)
def new_autoqc_job_setup(button_clicks, run_id, instrument_id, chromatography, bio_standards, sequence, metadata, acquisition_path, qc_config_id, job_type):

    """
    This callback initiates the following:
    1. Writing a new instrument run to the database
    2. Generate parameters files for MS-DIAL processing
    3a. Initializing run monitoring at the given directory for an active run, or
    3b. Iterating through and processing data files for a completed run
    """

    # Write a new instrument run to the database
    db.insert_new_run(run_id, instrument_id, chromatography, bio_standards, sequence, metadata, qc_config_id)

    # Get MSPs and generate parameters files for MS-DIAL processing
    for polarity in ["Positive", "Negative"]:

        # Generate parameters files for processing samples
        msp_file_path = db.get_msp_file_path(chromatography, polarity)
        db.generate_msdial_parameters_file(chromatography, polarity, msp_file_path)

        # Generate parameters files for processing each biological standard
        if bio_standards is not None:
            for bio_standard in bio_standards:
                msp_file_path = db.get_msp_file_path(chromatography, polarity, bio_standard)
                db.generate_msdial_parameters_file(chromatography, polarity, msp_file_path, bio_standard)

    # Get filenames from sequence and filter out preblanks, wash, shutdown, etc.
    filenames = db.get_filenames_from_sequence(sequence)["File Name"].astype(str).tolist()

    # If this is for an active run, initialize run monitoring at the given directory
    if job_type == "active":
        listener = subprocess.Popen(["py", "AcquisitionListener.py", acquisition_path, str(filenames), run_id])
        return True, False, False, ""

    # If this is for a completed run, begin iterating through the files and process them
    elif job_type == "completed":
        return False, True, False, json.dumps(filenames)

    # Handle form validation errors
    else:
        return False, False, True, ""
Jump to relevant functions:
2. Rapid-QC-MS compares checksums
Once the acquisition listener has been called, it waits for a file to be created in the data acquisition path.
Upon file creation, watch_file() is called. It writes an initial MD5 checksum1 of the file to the database, and then initializes an indefinite loop.
DataAcquisitionEventHandler class in AcquisitionListener.py:
AcquisitionListener.py
def watch_file(self, path, filename, extension, check_interval=180):

    """
    Returns True if MD5 checksum on file matches the MD5 checksum written to the database 3 minutes ago.
    Effectively determines whether sample acquisition has been completed.
    """

    # Write initial MD5 checksum to database
    md5_checksum = get_md5(path + filename + "." + extension)
    db.update_md5_checksum(filename, md5_checksum)

    # Watch file indefinitely
    while os.path.exists(path):

        # Wait 3 minutes
        time.sleep(check_interval)

        new_md5 = get_md5(path + filename + "." + extension)
        old_md5 = db.get_md5(filename)

        # If the MD5 checksum after 3 mins is the same as before, file is done acquiring
        if new_md5 == old_md5:
            break
        else:
            db.update_md5_checksum(filename, new_md5)

    return True
The loop waits 3 minutes, then computes the file’s MD5 checksum again. If the checksums match, Rapid-QC-MS then checks whether the next sample has begun acquiring (unless, of course, it is the last sample in the sequence).
If checksums match and the next sample in the sequence has begun acquiring, the loop breaks and qc.process_data_file() is called. If either requirement is not filled, the loop repeats and waits again.
DataAcquisitionEventHandler class in AcquisitionListener.py:
AcquisitionListener.py
def on_created(self, event):

    """
    Listen for data file creation
    """

    # Remove directory path and file extension from filename
    ...

    # Check if file created is in the sequence
    if not event.is_directory and filename in self.filenames:

        # Start watching file until sample acquisition is complete
        sample_acquired = self.watch_file(path, filename, extension)

        # Execute QC processing
        if sample_acquired:
            qc.process_data_file(event.src_path, filename, extension, self.run_id)

        # Terminate listener when the last data file is acquired
        if filename == self.filenames[-1]:
            self.observer.stop()
Jump to relevant functions:
1An MD5 checksum is a 32-character serialized string that represents the contents of a file. If two files have the same MD5 checksum, it is highly likely that they are identical files. Computing this checksum is unlikely to corrupt raw data files, or files of any kind for that matter.
3. The processing pipeline is launched
The processing pipeline is a wrapper function called qc.process_data_file(), which gets executed when the instrument has finished writing to the data file. It is be described in detail in the upcoming steps.
In preparation, this function retrieves the following information from the database:
- Instrument run ID
- Chromatography method
- List of samples in run
- List of biological standards in run
- MS-DIAL parameters file path
- List of internal standards for chromatography
- List of targeted features for chromatography and biological standard
- MS-DIAL software folder path
It’s worth noting that this pipeline was intended to be modular2.
Simply put, the input for whatever data processing software is used is expected to be an mzML file.
The output of that data processing software should be then be a peak table, so that calculations and transformations can be made in the succeeding modules.
For the purpose of untargeted metabolomics, data is currently processed by calling the MS-DIAL via the command line.
Jump to relevant functions:
db.get_instrument_run()db.get_samples_in_run()db.get_parameter_file_path()db.get_targeted_features()db.get_internal_standards()db.get_msdial_directory()run_msconvert()run_msdial_processing()peak_list_to_dataframe()qc_sample()db.write_qc_results()
2As development continues, implementation of other data processing software tools is as straightforward as making a function call to that tool (and storing user parameters, of course).
4. MSConvert converts the raw data to mzML format
To ensure that the raw data remains untouched (and therefore uncorrupted) by Rapid-QC-MS, it is copied3 to a local app directory, Rapid-QC-MS/data.
MSConvert is then called via the command line. After a few seconds, the mzML file will be saved to Rapid-QC-MS/data.
To prevent unnecessary storage, the copy of the original raw data file is deleted.
AutoQCProcessing.py
def run_msconvert(path, filename, extension, output_folder):

    """
    Converts data files in closed vendor format to open mzML format
    """

    # Remove files in output folder (if any)
    try:
        for file in os.listdir(output_folder):
            os.remove(file)
    finally:
        # Copy original data file to output folder
        shutil.copy2(path + filename + "." + extension, output_folder)

    # Get MSConvert.exe
    try:
        msconvert_folder = db.get_msconvert_directory()
        msconvert_exe = '"' + msconvert_folder + '/msconvert.exe" '
    except:
        print("Failed to locate MSConvert.exe!")
        traceback.print_exc()
        return None

    # Run MSConvert in a subprocess
    command = msconvert_exe + output_folder + filename + "." + extension + " -o " + output_folder
    process = psutil.Popen(command)
    pid = process.pid

    # Check every second for 30 seconds if mzML file was created; if process hangs, terminate and return None
    for index in range(31):
        if not subprocess_is_running(pid):
            break
        else:
            if index != 30:
                time.sleep(1)
            else:
                kill_subprocess(pid)
                return None

    # Delete copy of original data file
    data_file_copy = output_folder + filename + "." + extension
    os.remove(data_file_copy)

    # Return mzML file path to indicate success
    return output_folder + filename + ".mzml"
Jump to relevant functions: - run_msconvert()
3Copying is performed using the native Python function shutil.copy2(), and is unlikely to corrupt the raw data file, or files of any kind.
5. MS-DIAL processes the mzML file
The run_msdial_processing() function is straightforward: the filename, file directory, and MS-DIAL parameter file are passed to MS-DIAL via a command-line call.
MS-DIAL takes about 15-30 seconds to process the file (depending on file size) before outputting an .msdial file, which is just a peak table in tab-delimited form.
AutoQCProcessing.py
def run_msdial_processing(filename, msdial_path, parameter_file, input_folder, output_folder):

    """
    Processes data files using MS-DIAL command line tools
    """

    # Navigate to directory containing MS-DIAL
    home = os.getcwd()
    os.chdir(msdial_path)

    # Run MS-DIAL
    command = "MsdialConsoleApp.exe lcmsdda -i " + input_folder \
              + " -o " + output_folder \
              + " -m " + parameter_file + " -p"
    os.system(command)

    # Clear data file directory for next sample
    for file in os.listdir(input_folder):
        filepath = os.path.join(input_folder, file)
        try:
            shutil.rmtree(filepath)
        except OSError:
            os.remove(filepath)

    # Return to original working directory
    os.chdir(home)

    # Return .msdial file path
    return output_folder + "/" + filename.split(".")[0] + ".msdial"
6. Rapid-QC-MS performs quality control checks
The .msdial file is then routed to the peak_list_to_dataframe() function, which searches for internal standards (or targeted features for a biological standard sample) before returning the peak list as a pandas DataFrame for further processing.
AutoQCProcessing.py
def peak_list_to_dataframe(sample_peak_list, internal_standards=None, targeted_features=None):

    """
    Returns DataFrame with m/z, RT, and intensity info for each internal standard in a given sample
    """

    # Convert .msdial file into a DataFrame
    df_peak_list = pd.read_csv(sample_peak_list, sep="\t", engine="python", skip_blank_lines=True)
    df_peak_list.rename(columns={"Title": "Name"}, inplace=True)

    # Get only the m/z, RT, and intensity columns
    df_peak_list = df_peak_list[["Name", "Precursor m/z", "RT (min)", "Height"]]

    # Query only internal standards (or targeted features for biological standard)
    if internal_standards is not None:
        df_peak_list = df_peak_list.loc[df_peak_list["Name"].isin(internal_standards)]
    elif targeted_features is not None:
        df_peak_list = df_peak_list.loc[df_peak_list["Name"].isin(targeted_features)]

    # DataFrame readiness
    df_peak_list.reset_index(drop=True, inplace=True)

    # Return DataFrame
    return df_peak_list
This DataFrame is passed to the qc_sample() function, which performs user-enabled QC checks based on user-defined criteria in Settings > QC Configurations. For Rapid-QC-MS v1.0, there are four checks performed:
- Intensity dropouts cutoff: the minimum number of missing internal standards in a sample to constitute a QC fail
- RT shift from library value cutoff: the minimum retention time shift from the expected library value to constitute a QC fail
- RT shift from in-run average cutoff: the minimum retention time shift from the average RT during the course of the run to constitute a QC fail
- m/z shift from library value cutoff: the minimum m/z shift from the expected library value to constitute a QC fail
The qc_sample() function returns two objects: the QC result (pass, warning, or fail), and a DataFrame containing QC results, or the results of the four checks detailed above.
Note: This function is long, comprehensive, and subject to change. If you’re interested in the implementation, check out the documentation.
Finally, the peak list DataFrame and QC result DataFrame are converted to JSON string format, and written to the relevant table (sample_qc_results or bio_qc_results) in the relevant instrument database using db.write_qc_results():
DatabaseFunctions.py
def write_qc_results(sample_id, run_id, json_mz, json_rt, json_intensity, qc_dataframe, qc_result, is_bio_standard):

    """
    Updates m/z, RT, and intensity info (as dictionary records) in appropriate table upon MS-DIAL processing completion
    """

    # Connect to database
    db_metadata, connection = connect_to_database(instrument_id)

    # Get "sample_qc_results" or "bio_qc_results" table
    if not is_bio_standard:
        qc_results_table = sa.Table("sample_qc_results", db_metadata, autoload=True)
    else:
        qc_results_table = sa.Table("bio_qc_results", db_metadata, autoload=True)

    # Prepare update (insert) of QC results to correct sample row
    update_qc_results = (
        sa.update(qc_results_table)
            .where((qc_results_table.c.sample_id == sample_id)
                   & (qc_results_table.c.run_id == run_id))
            .values(precursor_mz=json_mz,
                    retention_time=json_rt,
                    intensity=json_intensity,
                    qc_dataframe=qc_dataframe,
                    qc_result=qc_result)
    )

    # Execute UPDATE into database, then close the connection
    connection.execute(update_qc_results)
    connection.close()
Jump to relevant functions:
7. The user is notified of QC fails and warnings
If quality control checks result in a “Fail” or “Warning” result, an alert will be sent via Slack and/or email (if the user opts in for notifications).
AutoQCProcessing.py
# Send Slack notification (if they are enabled)
try:
    if db.slack_notifications_are_enabled():
        if qc_result != "Pass":
            alert = "QC " + qc_result + ": " + filename
            slack_bot.send_message(alert)
except:
    print("Failed to send Slack notification.")
    traceback.print_exc()
Currently, this is the simplest component of the pipeline, but posesses a large potential to transform analytical workflows. Future updates will bring more intelligent and informative messages, detailing what went wrong and which component of the LC-MS system may be causing the issue.
Jump to relevant functions:
8. The dashboard is refreshed with QC results
After QC results are written to the database, metadata for the instrument run is updated to trigger a dashboard refresh. The number of samples processed, including the number of passes and fails, is updated using update_sample_counters_for_run().
DatabaseFunctions.py
def update_sample_counters_for_run(instrument_id, run_id, qc_result, latest_sample):

    """
    Increments "completed" count, as well as "pass" and "fail" counts accordingly
    """

    df_instrument_run = get_instrument_run(instrument_id, run_id)
    completed = df_instrument_run["completed"].astype(int).tolist()[0] + 1
    passes = df_instrument_run["passes"].astype(int).tolist()[0]
    fails = df_instrument_run["fails"].astype(int).tolist()[0]

    if qc_result == "Pass" or qc_result == "Warning":
        passes = passes + 1
    elif qc_result == "Fail":
        fails = fails + 1

    db_metadata, connection = connect_to_database(main_database)
    instrument_runs_table = sa.Table("runs", db_metadata, autoload=True)

    update_status = (
        sa.update(instrument_runs_table)
            .where(instrument_runs_table.c.run_id == run_id)
            .values(
                completed=completed,
                passes=passes,
                fails=fails,
                latest_sample=latest_sample
        )
    )

    connection.execute(update_status)
    connection.close()
Meanwhile, the web app (served by Dash) stores its copy of the instrument run metadata in the user’s cache. Using a Dash Interval component, a Dash callback is triggered every 15 seconds to compare the run metadata in cache to the run metadata in the database.
DashWebApp.py
@app.callback(..., prevent_initial_call=True, suppress_callback_exceptions=True)
def load_data(refresh, active_cell, table_data, resources, instrument_id):

    """
    Updates and stores QC results in dcc.Store objects (user's browser session)
    """

    trigger = ctx.triggered_id

    if active_cell:
        run_id = table_data[active_cell["row"]]["Run ID"]
        status = table_data[active_cell["row"]]["Status"]

        # Ensure that refresh does not trigger data parsing if no new samples processed
        if trigger == "refresh-interval":
            completed_count_in_cache = json.loads(resources)["samples_completed"]
            actual_completed_count, total = db.get_completed_samples_count(instrument_id, run_id, status)

            if completed_count_in_cache == actual_completed_count:
                raise PreventUpdate

        # Otherwise, begin route: raw data -> parsed data -> user session cache -> plots
        return get_qc_results(instrument_id, run_id, status) + (True,)

    else:
        raise PreventUpdate
When a change in the database is detected (via comparing sample counters), all plots in the dashboard are re-populated. The callback continues to check for updates until the end of the instrument run, effectively updating itself in realtime.
Jump to relevant functions: